One of the most common defects during polishing operations or sfericizzazione is the occurrence of the turned down edge.
PRESENTATION
With “turned down edge” o TDE ( turned down edge) defining a limited circular ring close to the edge of the mirror, which rapidly increases its radius of curvature than the remaining generally spherical or parabolic surface. A simple figure schematically can help us to better understand the trend of the curve profile in a mirror section.
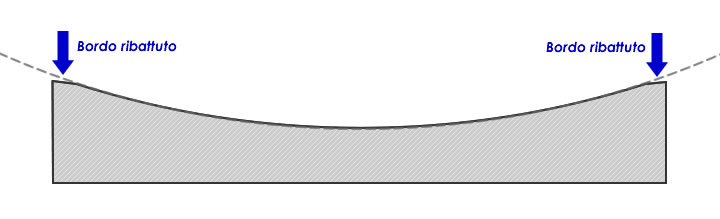
Fig 1 – Section of a concave mirror with retorted edge
The effect on the surface is that represented ( exaggeratedly ) in figure 1.
This area is generally not extended, order of a few mm, but it contributes a noticeable deterioration of image quality provided optics. In fact, while the rest of the surface appears concave, toward the edge there will be a sudden elongation of the radius of curvature that the reflected rays converge at a point farther than the reference parabola.
HOW TO RECOGNIZE
A diagnosis can be made with the use of the test Ronchi. By examining the image produced through the lattice by an eg position. intrafocale, the straight lines of a spherical surface or converged within a parabolic surface, tend to “incurvarsi” in a more accentuated manner approaching the edge and at the same time decreasing the width of the bands.
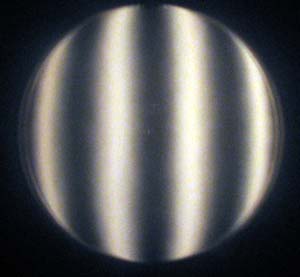
Fig. 2 – Turned down edge in a spherical mirror
PREVENTION’ BETTER THAN CURE
As we know the outer area of the mirror is the one that occupies more reflective surface and is also the one that is less tolerant of surface correction, so even a small extent defective board is actually a very serious problem for our optical.
Therefore, it is always better to avoid generating the edge retorted adopting appropriate measures and eliminating the possible causes of its formation:
- Racing Briefs:
Do not exceed the length of the races is perhaps the best way to not have to face as a result of the resolution of the problem . The short strokes more work the center of the mirror and provide a good surface regularity. Stretching races generates an abnormal pressure in the outer zone that, if prolonged, You can easily give rise to a low pressure area in the vicinity of the edge. - Pressure to the edge:
Always apply the pressure carefully to the edge and only if necessary, make sure during the execution of races that the palms of the hands over to push not also to load the additional weight on the edge, which would tend to make “to lift” the opposite end of the mirror generating, also in this case, an abnormal pressure during the thrust. - Bevel tool.
the pitch of the tool is subject to maladjustment and deformations during the processing, maintain a large chamfer, rifinendolo often and controlling the state , prevents the emergence of “increase” that can be formed even if you make repeated adaptations , which would tend to make work in an anomalous way, the edge of the mirror during the races. - Heat finger.
It may seem a pittance, but the amount of heat that the fingers, if positioned close to the edge and then in the machining surface , They are able to transmit to the glass, It is sufficient to expand the volume of the mirror locally, just enough to alter the shape beyond the tolerance values. In other words, we're going to work an outer area that is made “highest” heat added during the past. 're finished the session and reached thermal equilibrium again, You will be left with a lower outer area than it should be. Is’ appropriate to say that a mirror-respecting, It should be treated with kid gloves ! - Detachment from the tool.
At the end of session, always accompany the mirror by sliding it as much as possible prior to the posting, avoiding to lift it until the two surfaces are still in contact. Also in this case, raising an edge creates an abnormal pressure in the opposite edge that “download” in a small point of peripheral support all of your weight.
SOLUTION
He, despite the precautions we still need to intervene on a countered edge, We can do this in one way: since it is not possible to add the material to the edge to restore the original figure, we must necessarily remove the excess glass from the rest of the surface.
Starting then from this common element, various methods have been developed for the elimination of the edge retorted, in addition to the established technique back to the sphere of origin by means of the classical past 1/3 COC or even shorter ( 1/4 COC)
The method that we will examine in this article uses a sub-diameter to 50%. The aim is to redesign a new curve that would presumably be a more open than previous to contain the material removal, we reserve successively to deepen, from the center to restore the exact configuration.
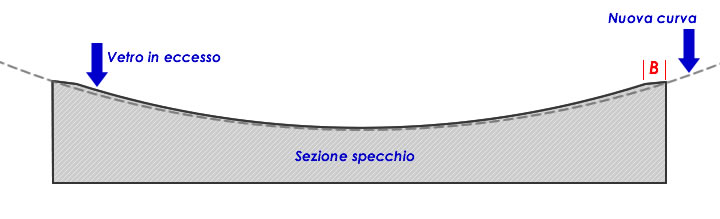
Fig 3 – the correction scheme
Both B the measure of the extent of the ribadutto edge that we will have previously attempted to assess through the Ronchi test.
We will position the edge of the sub-diameter close to this low pressure zone. The pressure will be located at the edge of the tool by exercising with the fingers of one hand while with the other will drive the tool in the race pushing from the lower edge and exerting traction from the upper.
The stroke length is large until 1/2 sub-D.
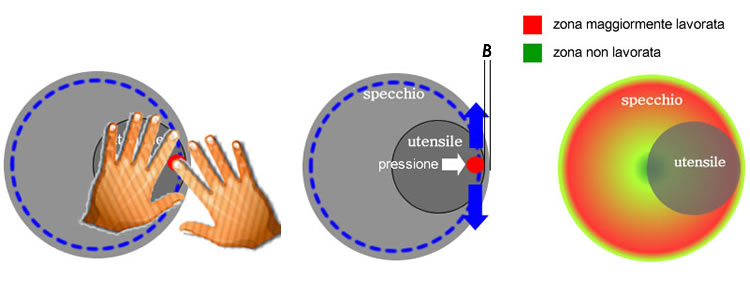
Fig. 4 – Implementing rules
As in the case of the other processing techniques that we will have during the races, the operator executes a rotational displacement around the mirror and at the same time a rotation of the tool in the opposite direction.
The application of this technique with localized pressure to the edge will allow us to obtain the greatest benefits precisely in the border area between the concave surface and the edge retorted. The outside of this area will be affected and worked marginally as will not suffer any action right in the moment of greatest effectiveness of subdiametro in the inner area, and it will only be machined with connecting action during the maximum extension of the race.
OPTIONS
The sub diameter used in this mode is able to generate real “furrows” subjected to pressure in the sector.
Per “soften” the effects of’ action and standardize the connection between the various zones is useful to perform during a session with a few laps trajectory of expansion ran inwards to an extent not exceeding a 1/3 Sub-D.
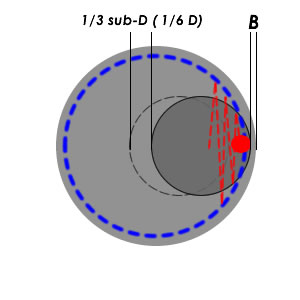
Fig. 5 – variant “soft”
How many rounds or sessions are to do with this mode “expanded” and to evaluate in each case (*), the Ronchi test should be carried out often, at least every half hour of actual work and will give important information about the progress of correction, if you notice a too vigorous action on the periphery to the center, or a non-regular fitting between zones, it is best to proceed with the mode “soft” until the surface regularization.
(*)You can consider the expansion stroke towards the inside as a sort of “brake” the action of the sub-diameter, which displaces part of working towards the center by reducing the amount of material removed from the periphery. How to press on the brake or accelerator depends on the type of route which will meet.
Bartolomei Mirco
massimar