- This topic has 42 replies, 5 voices, and was last updated 3 years, 1 months ago by
Giulio TiberinI .
-
AuthorPosts
-
5 October 2016 at 10:29 #8652
80 120 220 400 600 800 cerium oxide
this is the sequence of abrasives that I would use for a 300 F5, but it is not the only possible , others make different choices.
5 October 2016 at 14:51 #8658I agree with what he said Massimo.
The purpose of the choice of the abrasive grain gradations is to rapidly progress in work, failing to see eye with a microscope, when it's time to change grained, that is, when the finer grain has canceled all the craters of the previous coarser.
Of those microscopes I took another day before yesterday …..from 8,95 $ = 6,12 euro, Shipping from China including visible here: http://www.ebay.com/bhp/pocket-microscope . he has 100 magnifications and a lattice inside the eyepiece divisions by two cents, in which you can clearly see very old craters from a few microns).That optimal progress is achieved more or less from time to time by halving the size of the average abrasive grain.
The important thing is that there is a visible difference between the craters of two contiguous grits to be able to decide to switch to the next finer landslide.
If the grain size are too close it is hard to judge the disappearance of former craters but working less; if they are far away stands well the difference but working longer.
the gradation indicated by Massimo are:
80 – 120 – 220 – 400 – 600 – 800 – cerium oxide
Which corresponds to a grain size in microns:
192 – 116 – 66 – 23 – 16 – 12 – 2But any other content but close to half goes equally well: for example the 320 (grain 36 micon) instead the 400
5 October 2016 at 15:16 #8659The 320 In fact, it would be even better with this sequence: 80 120 220 320 500 800, just that 500 It is hard to find and the passage 320-600 when I tried it I thought it was excessive, it took more time and work than other grain-steps.
5 October 2016 at 15:29 #8664Ciao,
Very well, but what do I have to buy?
And for the pitch, where you buy?Franco
5 October 2016 at 18:57 #8665Franco, I have already answered you
 : who
: whofor rosin ( rosins ) turpentine, linseed oil and beeswax, you should make a trip to the hardware store in your area, I have always done well, usually those best
“equipped” sell these products5 October 2016 at 20:18 #8671abrasives, The pitch “Black” Gugolz and the rest of the polishing products you can find them here beyond the Alps:
http://www.optiques-astro-moindrot.com/taille_de_verre.htmlthe Gugolz #55 It is softer and is better for use “wintry”, while #64 it's more “dura” and it goes well in summer.
14 March 2021 at 19:26 #12120Hi everyone.
Is’ almost a decade since my last post in this article; problems of all kinds have diverted my energies.
I bought the blanks and abrasives and built a roughing machine. Most material I had accumulated over the years, as a good maker, and finally it helped.
I built 2 tools, 300 e 240 mm diametro. I used M10 nuts and glue for outdoor tiles, two thick discs 40 mm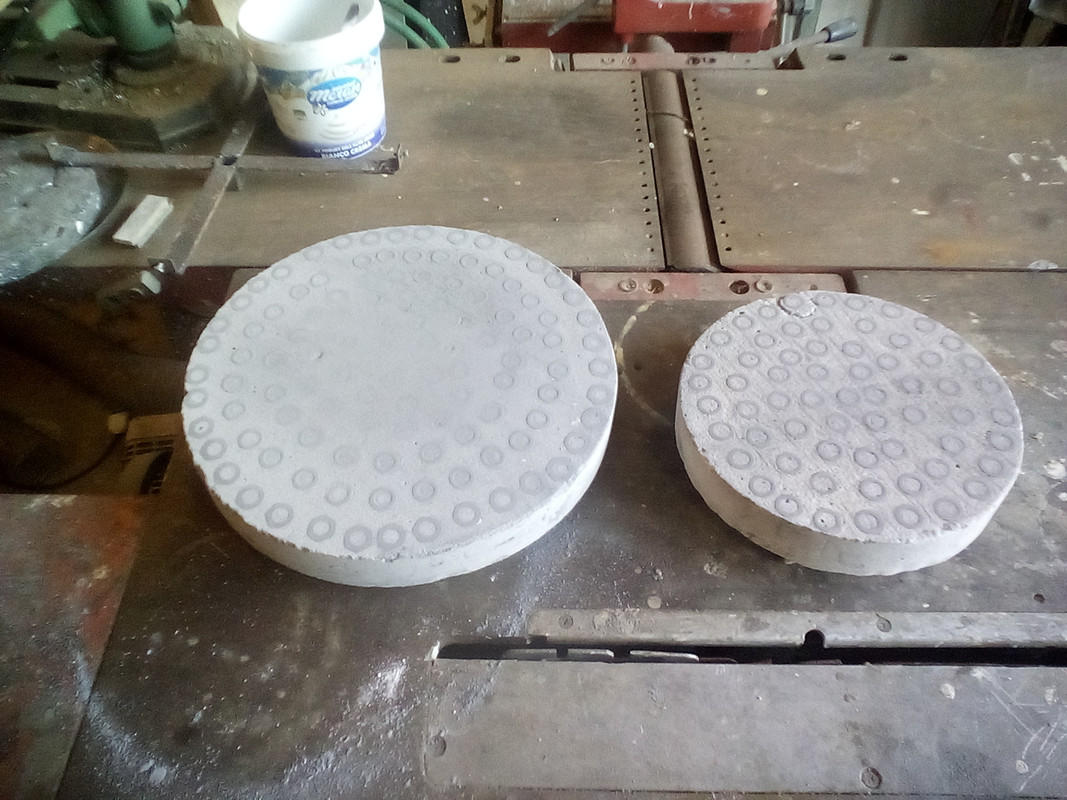
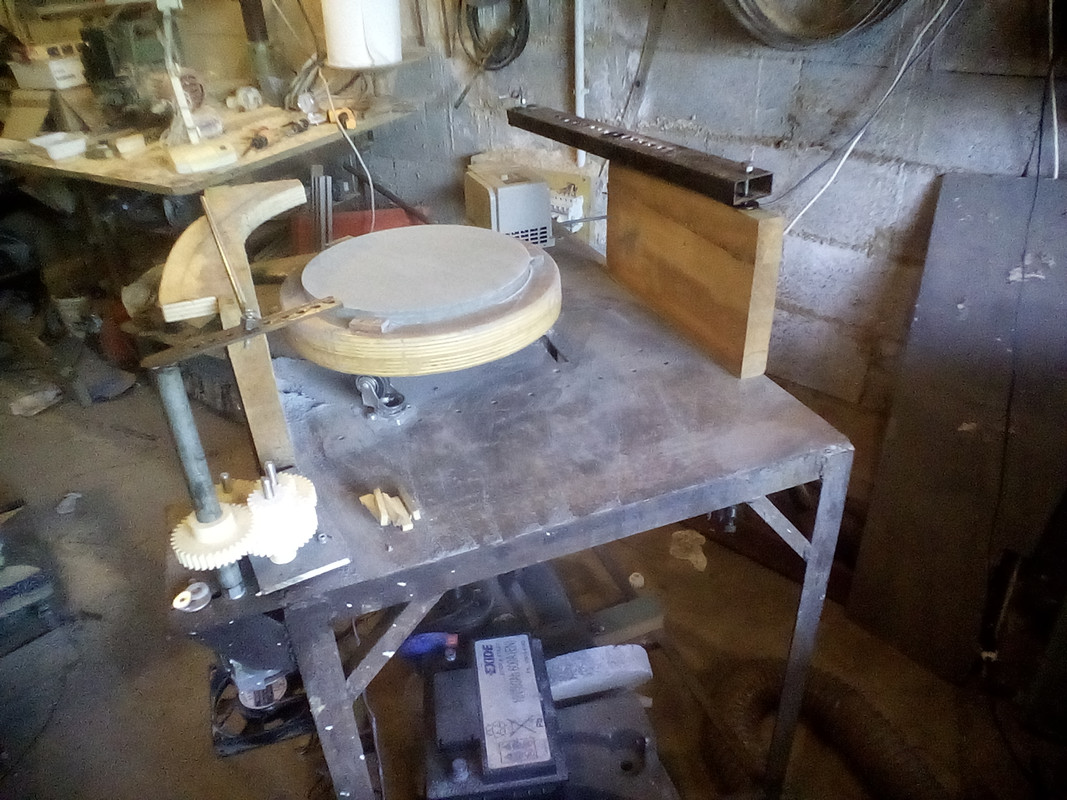
I had a three-phase motor with reducer that I had purchased to motorize an antenna, I made a rotating table and an oscillating arm that moves the tool / blank
3D printed sprockets reduce the revs of a 220V moped.Two weeks ago I started, it was a constant try and try again, then I put the full diameter tool underneath, the blank above and away, now I have arrived at an arrow of 3 mm, focus 1812; the spherometer measures me 30 cent / mm practically on the entire mirror, I miss the focal length F1500.
All with grain 80! And now the problem arises. I continue with the 80th step to the 120? Still full diameter or I put the tool diameter 240, mirror above or below?I tried to put two photos but something is not working
I also shot a video but I don't know how to post it on the ForumFranco
Franco
14 March 2021 at 21:24 #12122Hello Franco, I tried to fix the image links: the first is functional, the others must be re-entered because they are not correct.
-to post images in the forum from postimage :
1- upload the image to Postimage
2- copy the link “direct link” from the table that will open at the end of the upload
3- go back to the post you were writing and click on “img” in the tag bar.
4- paste the link and give it twice “ok”to insert videos the simplest way is to upload them on youtube and paste the link directly on the post
Regarding reaching depth, you can continue with 80 ( to get there faster ) or go to 120 ( to get there more slowly but with more uniformity of the surface ) always remembering that to maintain the depth reached ( that is, without increasing or decreasing it ) you have to alternate the mirror positions above / below at each session.
-clearly the alternation of the top-bottom positions can only be done with the full diameter.
-in the case of the smallest tool, you can also deepen the center or the edge to increase or decrease the relative depth, but it must be done by increasing or decreasing the length of the strokes, with the tool always in the upper position. ( actually the technique to decrease the depth with sub-diameter is a bit’ more’ articulated, but in general it is this )I didn't quite understand which of the two tools you are working with, but in any case you have to continue with the one you have worked with so far, the other tool, the least used, by now it will have a complementary shape and depth (that is one “height” )which is far from the current one of the mirror and therefore would abnormally dig the surface leading to shape errors that are difficult to correct.
16 March 2021 at 11:51 #12124Hi Massimo,
Now I'm working with the full diameter tool. I will continue with grana 80 to switch to 120 when I'm near.
The smallest tool is the one I used for the tests, with mirror below, then I didn't like the result I built the new tool.
I've always worked dry, at what level water is added?I uploaded the video to my Drive; here is the link
Video RoughingFurthermore, re-measuring the mirror I realized that a ring has been created between the edge and the center, that is, the center is less deep than 2 cent/mm. how should I operate to remove it?
Franco
16 March 2021 at 22:01 #12127Hello Franco. Glad you resumed work!
I believe that with the turntable you will have a nice relief from work and a good result in a short time.You write:
Two weeks ago I started, it was a constant try and try again, then I put the full diameter tool underneath, and the blank above and away, now I have arrived at an arrow of 3 mm, focus 1812; the spherometer measures me 30 cent / mm practically on the entire mirror, I miss the focal length F1500.And, a 305mm diameter mirror requires hollowing out an initial spherical cap with a 3.75mm deep arrow, (that is equal to: Mirror radius squared, divided 4 times the focal length).
Sphere that will then have to be parabolized, perhaps as a precaution not touching the most difficult area at the edge, and deepening with the parable towards the center, with one final difference from the sphere of suns 2,34 microns.
I also believe it can be useful to you (if you haven't done so yet) watch this movie by Gordon Waite,
…using a "Fixed post" turntable machine, similar to yours, but without your alternating arm. But that with only the engine of the plate, in roughing and polishing, that's all it takes to not complicate the consequences of arm work.
The swing arm is more difficult and dangerous to use at the beginning because it is quick to parabolize when it is not yet time. for example while you are still roughing or polishing, knocking down the edge with its uncontrolled exits to the right and left ruining the sphere.
The parameters of using the "fixed post" in that movie, and in general, I am alone 2: Ratio between mirror diameter and tool diameter, and tool decentralization.
That: Diameter tool from 70 to 80% of the mirror (in the movie he uses a diameter tool 230 on the 280mm mirror); and decentralization of the 30% the mirror diameter; which in the video is 100mm which means that the tool "overflows" that is, it comes out of the mirror edge by 25mm, dragged in rotation induced by that of the mirror.All with grain 80! And now the problem arises. I continue with the 80th step to the 120? Still full diameter or I put the tool diameter 240, mirror above or below?
Now I'm working with the full diameter tool. I will continue with grana 80 to switch to 120 when I'm near.Mirror above or below works well when working by hand. You can adjust the depth of digging with a machine like yours with decentralization, because I wouldn't be so sure it looks good with the mirror above that I have never seen used in a similar machine.
I've always worked dry, at what level water is added?
You can use water right from the start to humidify, with the advantage that it does not disperse silica dust in the air; and the abrasive works better because it is "lubricated" by water rather than being low, it also holds it together by capillarity.
Furthermore, re-measuring the mirror I realized that a ring has been created between the edge and the center, that is, the center is less deep than 2 cent/mm. how should I operate to remove it?
I do not know, but being a zone error, I would think that it is the fault of something that is repeated cyclically over time, how could be the difference in abrasion due to the stop due to the inversion of the swinging arm motion.
But the problem could also come from the position of the mirror above, which reverses the roles in the machine between tool and mirror. Given the thin thickness of the mirror that if it is above, it is not laid and supported uniformly over its entire rear surface.. rather.. is loaded with ballast, while moreover it works in a rush.Putting mirror underneath and utensil on top would work in a traditionally recognized safer way.
However, these are just my old-line thoughts
 17 March 2021 at 14:27 #12129
hello Giulio, happy to hear from you
The problem with the ring is that the tool has not yet worn enough; in fact, if you look at the photo in the center you do not see the print of the dice. Is’ happened because I started with the tool from 240 then dissatisfied, I mounted the tool from 300 but it was new.
Now I reassemble the 240, mirror below and let's get it back in order.
I noticed that Waite created grooves in the tool between the nuts. Are needed?Franco
18 March 2021 at 22:37 #12131Hello Franco,
Congratulations on your accomplishment
A couple of observations:
1) you absolutely must start adding water during processing, breaks down dust in the air, lubricates the surfaces and distributes the abrasive more evenly.
2) If you can, try to limit the jerkiness of the eccentric during rotation. Surely spraying water between the glasses can help minimize clicks, or decrease the weight added above, or finally decrease a little the play that there are between the various components of the arms.
3) Looking at the eye in my opinion the overflow you are using is a bit excessive, I would not want you to generate an incorrect figure. But anyway, for excavation, I would suggest you use another technique.
4) As already suggested by Giulio, I would move on to processing “Fixed Post” it is a tried and tested technique and it works well (I'm telling you because I used it too). mirror under, tool al 70/80% the diameter of the mirror, and overflow around the 20-25% the tool diameter. Rotation speed of the rotating table even a little more sustained, without exaggerating and if you want, you can use a slight right / left movement of the tool (10-15 mm) to avoid that the edge of the tool always passes in the same place above the mirror (Although with coarse grits you can very well use the “fixed post” pure). In my opinion this way you should feel good about it. let us know Ciao
Good luck and see you soon
Mirco 20 March 2021 at 23:48 #12132
I noticed that Waite created grooves in the tool in the plaster between the nuts. Are needed?
Hello Franco
I can't tell you, MA dubiterei… that the machine can be of some help.
I certainly could be wrong, but honestly I would think not, both in hand and machine work.The reason it seems to me is that you could use any object in blank, good if flat and in diameter like, or near that of the mirror, which is the only requirement for reasons of uniformity of the machined surface.
While the grooves are absent during surface refinement, whether they are small or large, I don't see how they can help or penalize the work of the abrasive, because the metal nuts are not worn very much, at most the abrasive would already tend to abrade the intermediate plaster a little, however maintaining the surface substantially complementary to that of the mirror being worked.
Obviously such a tool with metal nuts embedded in plaster, it must not be changed during construction so as not to ruin everything. And once used for a mirror, can be reused for another, but starting from roughing, so that thanks to the coarse abrasives he will be able to readjust to the progression of the new job.
All this does not apply in polishing, where the pitch coating absolutely needs nice wide grooves around the 5 or more mm, to allow it to yield and expand without obstructing the channels and piling up by varying the curvature of the contact surface, ruining everything instead of improving.
-
AuthorPosts
- You must be logged in to reply to this topic.