


- This topic has 195 replies, 7 voices, and was last updated 1 month, 1 week ago by
 Massimo Marconi.
-
AuthorPosts
-
1 November 2015 at 18:05 #6943
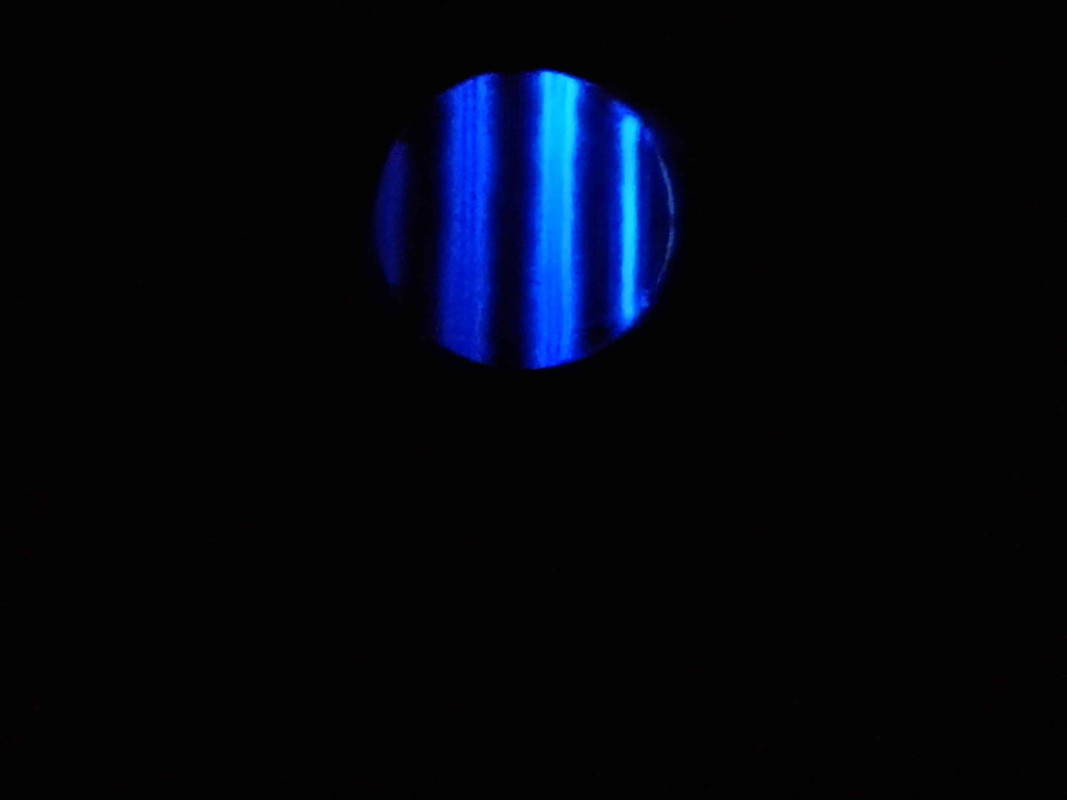
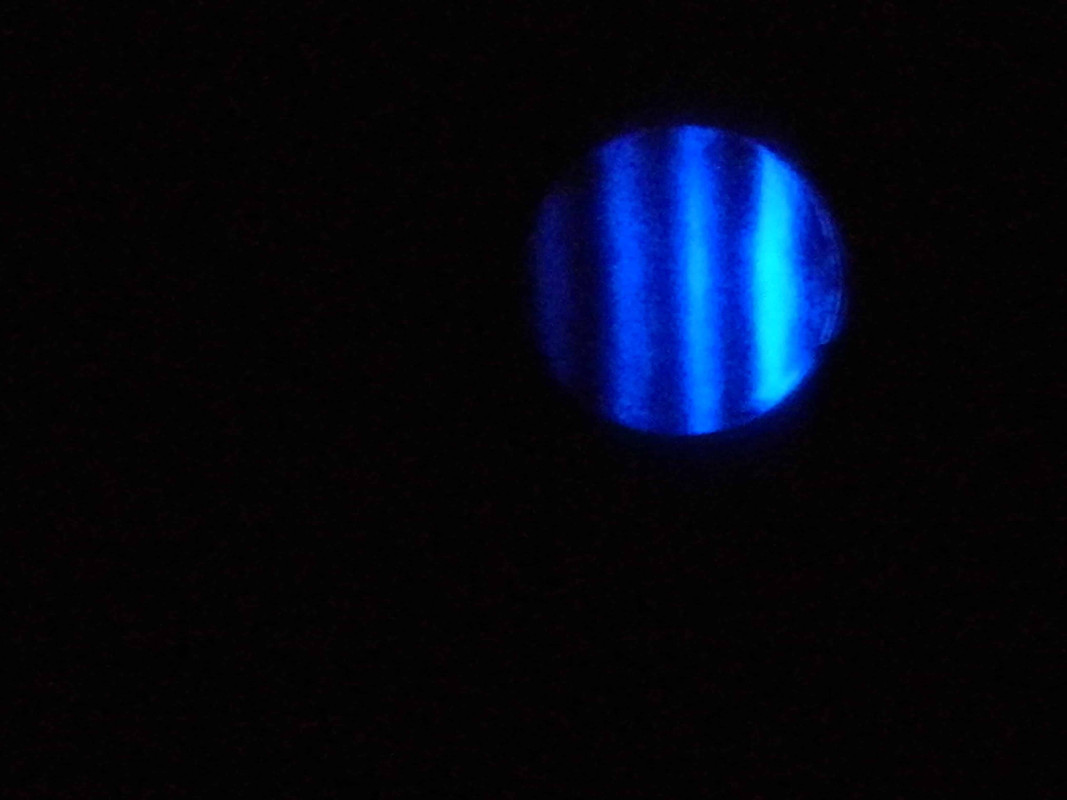
Beautiful sphere Maurizio ! the first images with the copper grating are definitely better, if this is the situation it seems like a good sphere to me, I don't see any hills in the center, I just see a slight tendency for the suburbs to stick around a bit’ “high” ( we are intra-focal. vero ? ).
Definitely with a few more sessions 1/3 COC with perfectly adapted patina you should be able to regularize the surface, However, consider that you are already at a good point to think about starting the parabolization 1 November 2015 at 19:03 #6944
Today after others 45 min of work I took more photos
3 with copper lattice 3 with printed grid.
It seems a little better what do you think??http://s7.postimg.cc/ad754kxiz/IMG_20151101_173022.jpg
http://s1.postimg.cc/pojh3tikf/IMG_20151101_173028.jpg
http://s17.postimg.cc/f9gsdta4v/IMG_20151101_173742.jpg
http://s13.postimg.cc/ogfme2kon/IMG_20151101_174625.jpg
http://s23.postimg.cc/ak99pjnd7/IMG_20151101_174701.jpg
http://s1.postimg.cc/3tg2oclz3/IMG_20151101_174913.jpgmaurizio
1 November 2015 at 19:17 #6945The photos are all intrafocal
1 November 2015 at 19:47 #6946hello Maurizio, much better than before…
And, you are getting closer and closer to a good sphere. You are already on the right track now, although I always see strange undulations in the lines of Ronchi. I say strange because areas on the same radius but on different lines do not always seem congruent. In any case, the ball is coming along well, keep it up…another couple of sessions without pressure with well adapted pitch always with runs 1/3 COC and the shape should regularize.
P.S: just throw it away (or better yet put it aside) the printed grid, the quality of the images compared to the one with copper wire is evidently lower, so from now on you only take pictures with the copper one. One more thing, try to take photos with different number of lines (and it's one where they only see each other 2-3 other lines with only 3-4 lines and others where more are seen, kind 5-6) this allows us to better evaluate the various errors.
Ciao, We await updates…continue on this path… 2 November 2015 at 2:23 #6950
I believe the waviness visible in some images depends on the setup, as the light from the source is not uniform .
In some places it is “overexposed” in others it is too dark . When the intensity of the source is too high only in one area, it means that the LED is not well centered with respect to the camera.
What happens then is that the illuminated areas are “eat” part of the shaded areas, resulting in the line appearing dark “jagged” a deformed one.If there is a defect in the surface it must still be visible in all images, especially in those with more definition, this is why I believe that the third image is more reliable than the others , the lines are straight and show a good sphere in a well-lit field in the central part, while you can see it in the lower right part of the same photo, the brightness of the LED is higher and it is possible to notice the effect due to too much light/exposure which begins to deform the linearity of the reticle making it seem almost “transparent”.
Maurizio, These images are good though, a nice leap in quality compared to the first ones, it is clear that, as in all things, practice leads to better and better results.
2 November 2015 at 11:22 #6951hello Maurizio.
I agree with Mirco's suggestions (especially not to use that printed reticle) and Massimo.I would only advise you to take very good care of the alignment of the tester and the light source with respect to the mirror.
Good alignment (which is essential with the Foucault test), can create problems “reading” even with the simple Ronchi, even if a defect is actually a defect only if it can be found in all the images.3 November 2015 at 11:58 #6971Hi guys,first of all thanks for the advice.
But there is one thing that is not yet very clear to me and that is’ this:
I have always read online that when we work with the mirror and tool,if we put the tool below and the mirror above and lengthen the passes compared 1/3 COC
(is: 1/2 COC) the edge wears out more if we shorten them instead 1/3 COC and consume
plus the center of the mirror ; Now if we put the mirror below and the tool above the opposite occurs i.e’ which means that in this case lengthening the passes compared to
1/3 COC wears out the center? This isn't me’ still very light at the bottom I lengthen the passes in the same way as with the tool below and the mirror above.
I hope I have been clear.thank you
maurizio
3 November 2015 at 12:06 #6972Yes, right, con MoT (mirror on top or mirror above) if you lengthen the passes you dig more on the edge, if you shorten them instead you dig more in the center.
The opposite happens with ToT (tool on top of utensil sopra), if you lengthen the passes you dig more in the center, while if you shorten them you dig more into the edge… 3 November 2015 at 12:51 #6974I agree with Mirco, however… Watch out for the pressure , plays a fundamental role ! abrasion always occurs more effectively at the point of application of pressure.
With the mirror above, pressure in the center and long passes exactly the opposite happens, the center deepens with respect to the periphery and generating ( in the long run ) a beautiful one ( so to speak ) turned down edge
I want to say something else, aware that most glass scrapers will not agree and I risk it “excommunication”
 , but I say it anyway because I am convinced of it:
past 1/3 COC without any pressure ( regardless of the position above or below the mirror and tool ) it is the only one that uniformly digs the entire surface. Its effect is to build and maintain a sphere “stable” e ( always in my opinion ) prolonged processing with this technique does not produce any increase in depth but only a uniform consumption of the entire surface which remains spherical and keeps its radius of curvature unchanged.
Then ( for example ) I don't agree with the theory ( also supported in some illustrious tutorials ) than during roughing/grinding, the last tenths/hundredths of a mm of depth must be reached with the 1/3 COC. I am convinced that by doing this you remain exactly at the depth reached and do not advance even a thousandth, apart from small ones “adjustments” due to the regularization of the surface until reaching the sphere with increasingly finer abrasives.
Now I demand that one be unleashed “religious war ”
3 November 2015 at 13:29 #6975Agree that pressure plays a fundamental role and that racing 1/3 COC produce a stable sphere, but not about the fact that the radius of curvature does not change.
I think that this technique always digs (obviously proportional to the size of the grain used) increasingly decreasing the radius of curvature. Again in my opinion it is not true that it digs uniformly across the entire surface, in fact I think it digs more into the center than the edge, still generating a sphere…3 November 2015 at 13:50 #6978Let's start from the fact that the sphere is the only geometric figure that allows two surfaces to always remain in contact no matter how they move over each other. ( the plane also has this property but we can think of a flat sector as a spherical sector of infinite radius )
Now, if he passed 1/3 COC generates a spherical shape ( and we all agree on this ) it means that it must necessarily bring every point of the two surfaces into contact , always keep them in contact and therefore work them uniformly , otherwise the generated sphere would not remain stable and would take on another shape.
If at a certain point we have an increase in depth it means that there will be an instant in which one part of the surface is worked more than another and therefore, the previous assumption which is the only one that can guarantee the construction of a sphere disappears “perfect”.
3 November 2015 at 14:03 #6980Hey guys, that's how I like discussions!
We say what is the fruit of our own lived experience.I can only agree with everyone, but not to change the length of the runs 1/3 D c.o.c in the creation phase of the starting sphere from which a good mirror will have to derive
With this I underline that for a beginner it is very advisable not to go and put the “ass in the kicks”, keeping in mind and confidently implementing the centuries-old rules of “good ball”, that starting first of all from imposing the famous races 1/3 Diameter c.o.c (which means that the forward/reverse edge must not exceed 1/6 the diameter), indicates their effect famously as follows:
1) With the mirror above you dig the center up to 70% of the diameter leaving the periphery almost untouched, while
2) With the mirror underneath you dig from 70% of the diameter up to the edge, leaving the lower area almost untouched 70%.
3) Consequence is that alternating the drying in a balanced way, the depth of the arrow achieved is maintainedBut from this it follows that if I want to delve deeper into the center I must make the annoyances with the mirror above preponderant (but always without lengthening the runs), with a lot of patience because in this game you can never have everything right away.
By this I mean that if I want to delve deeper into the center, instead of a nuisance “above and one below”, I'll do two on top and one on the bottom, or three above and one below (but without lengthening the runs), and the alternation must in any case be maintained so as not to stray too far from the good sphere.But be careful, the races get longer (and eventually widen) only in parabolization, and by extending them in polishing you never produce a good sphere but with the mirror above or below, the edge is immediately flared in an exaggerated way, making it crimped, just as the same edge flares out too much when you don't keep an eye on the right-left lateral edge, which must not be exceeded 1/6 Diameter (for a 300 mm I am 1,5 cm pears part), and therefore it is much better “think” the right left overhang as ZERO overhang, to stay within the random centimeter and a half.
From my experience, with this, be very careful not to exceed the forward-backward edge of the famous one 1/3 D c.o.c, and in thinking of the lateral overflow as zero (while then working it comes out on average about 1/8 D), you already get a pseudo sphere which is slightly flared towards the parabola. And this is good because it makes the parabolization work a little shorter.
(the verification of the pseudo sphere above is done with the Foucault test for the areas at the center and at the edge only, subtracting the center draft from the edge draft, to see what the current flare is compared to that of the theoretical reference parabola. Difference that if the mirror were a perfect sphere would be zero)
These now centuries-old rules serve to provide those starting out with the safest path possible. Rest assured that if you want to experiment for your study, he can do it with good reason.
3 November 2015 at 14:18 #6986To say Massimo, I have always worked on my mirror and immediately with racing 1/3 COC. if it were true that the surface is dug uniformly I would never have managed to dig the surface and I would still have my two flat discs. However, it is not true that the two surfaces of the tool and the mirror are perfectly equal (as radius of curvature) because there is abrasive in the middle. However small it may be, it is there…
3 November 2015 at 14:31 #6987And, the abrasive creates a difference in the spokes, fair consideration, I have to think about it…
However, it has never happened to me that I was able to dig ( in the sense of going deeper ) with this pass, if not of small and negligible values, to the point that the last two processes on the 300 I deliberately reached the design depth only with the chord and the value achieved remained as such ( almost ) even after the entire succession of abrasives with 1/3 coc, always keeping the mirror above…
4 November 2015 at 2:45 #6988Well done Mirco !
in fact the answer is in your consideration of the thickness of the abrasive which creates a small difference between the radii of curvature of the two spheres in contact.
Please note that this does not disprove my statement about the technique 1/3 COC, indeed it confirms it ! The validity of your answer lies precisely in the fact that it manages to make two apparently different positions coherent, I'll explain:– as mentioned the technique 1/3 COC tends to make the two surfaces uniform to the spherical one, working all the points equally without increasing the depth.
this assumption is fundamental, as the difference between the radii of curvature can only be created if the abrasive is distributed uniformly on all surfaces, otherwise neither would be spherical.
Therefore it is not the technique that increases the depth, but the attempt of the same technique to standardize and make stable two surfaces which will always remain of different radius as there will always be interposition of abrasive.
to make them uniform you will necessarily have to modify the value of the radius of one sphere to make it equal to the other ( or at an average value ? ), but for every small increase/decrease of one there corresponds an analogue of the other ( due to the thick abrasive ) . This new value in turn will constitute the “delta” to be deleted in the next session and so on…
The depth value acquired after each session can never be greater than the grain size of the abrasive, for this reason the past ad 1/3 provides appreciable results in in-depth analysis only with roughing grits, while with those ends ( as has always happened to me ) the depth varies by a few hundredths of a mm
So an abrasive “infinitesimo” like cerium or even finer, produces with the 1/3 COC an infinitesimal in-depth analysis, precisely because it is not this technique that generates the depth but the thickness of the abrasive layer.
Other techniques, however, tend to generate depth precisely due to the methods of execution, regardless of the abrasive, which in these cases only performs the function of “grater”.
-
AuthorPosts




- You must be logged in to reply to this topic.