Now that, with previous articles we did a little 'light on the road to complete the construction of a mirror, we walk that way "that becomes increasingly narrow and challenging" parabolizing slowly with a slow progression of quality.
Obviously this is a simulation of what would happen in reality, but it is very likely, as a case study in which he came to find anyone who has been down that road at least once.
For convenience we will support the already seen excel sheets translated and adapted, whose original provenance it is explicitly indicated on the same, beginning to revisit, a little over, the sheet relative to the baseline situation found on the first of Foucault test.
Any program for the calculation of the Foucault test management can, however, give equivalent results by inserting the same starting data.
But the question that we all mentally pose during the progression of the polishing work is: "When I can start Foucault testing?”
And the first obvious answer is: "When the mirror surface is completely and perfectly polished".
About this, achieved good polishing, advisable to check which type of deformation has currently, broadly, the surface of our mirror.
To do this, measure the gap between the draw of the center to the edge.
This gap is measured with a "fast" Foucault test , with or without Couder mask , Searching the flat grey in the Center mirros and taking note, and through it, go to reaching the flat grey of the most peripheral zone, , then subtract from the value of the peripheral zone, the center value, to determine what is the difference of total radius of our current surface.
REMEMBERING THAT:
- The measurement of different drawings using the Foucault test, It indicates the difference of the radius of curvature in the various points of the surface under examination.
- We also know that with the races 1/3 c.o.c, ie containing the ooze “forward backward” in 1/3 diametro c.o.c, and containing the lateral swiveling out in 1/6 or 1/8, we get a good spherical surface, which it is the desirable starting condition for obtaining a good parable.
- We also know that the spherical surface It has a single radius of curvature, and therefore if we measure the draft in the center mirror, and then to the edge of a sphere, we will find the same value, or at least two values whosedifference is tending to zero.
- We know that our perfect theoretical parable keep as reference for our work is achieved when the difference between the raw of the Center and the draw at the edge is equal to the difference between the aberrations hm2/R of its centre and its edge(See the image below in the spreadsheet : H25 box less E25 box) 3.469-0.145= 3.32 mm
- Then we deduce that from our testing of draws, we would have a good condition to start the Foucault test when the difference between the draft at the edge and one in the center, It lies in values between zero and 3,32mm
- If these values exceed the 3.32mm indicate that our area has already exceeded the limit of the parabolic shape, encroaching towards the hyperbola, which it is obviously useless for our purpose. And therefore, in this case, you would still continue to work with the strokes indicated at point 2, taking care to not spill over beyond the values of 1 / 3D c.o.c; e in 1 / 8D c.o.c. In fact, when the draws are so high, the reason is that you are not respected ooze indicated.
With these premises, we can see the image of the following spreadsheet, that the outer draw measured on our surface, H27 is in the box, while the center is in the box E27, and their difference is 1 mm. So we are in the presence of a good spheroid and we can start the Foucault test to progress toward working paraboila.
NOTES ON RETOUCHES AND THEIR DURATION of EXECUTION
The rules of the game of the corrections mentioned in many reference texts are as follows:
Defect: Correction
- Edge High (Edge High) : To work 5-10 minutes with mirror under, with strokes in W shape, 1 / 4D with a slight over-pressure of the hand on the side that are "over the border".
- Turned edge down (TDE= Turned Down Edge): Cut the pitch well at the rim of the tool, check the channels that are well open on his surface, work with mirror under and with strokes 1 / 4D. An hour of work would retrieve 1mm draw at the edge.
- center high (Center High): With mirror up, work above the center on the 2 / 3D tool with small strokes in W shape 1 / 4D, counting to recover 1 mm aberration each 5 minutes of work.
- central Hole (Center Low): Strokes 1 / 6D with two wets with mirror up against one at mirror down. The efficiency would be an hour of work for each 1mm draw corrected.
- Center hole and turned edge down (CL TDE): The mirror is no longer spherical (and his shaper may be tend to hyperbolic or parabolic or elliptic), You get these bad shapes by making polishing strokes too large. Verify also that the pitch is not too soft, trim it to the exact edge of the tool. Making strokes in W narrow at the center and 1 / 4D alternating mirror above and below. In this way the work abrade the zone to 70% Diameter, and returns slowly back to a good sphere shape.
- For any zonal error: You can go back to the sphere with strokes 1/3D center over center alternating with mirror above, and after below..
Remember also that in General is always valid the speech:
- Acting with the mirror above and tool below, They abrade and deepens the mirror Center, leaving almost intact the border.
- Using the mirror below and the tool above it, it abrades and deepens more the edge of the mirror, leaving the center intact. But be careful because (with strokes too larges out over the borders) it is easy to break down the edge that always has a narrow tolerance with respect to the center, and is a defect that must be corrected because it will void the quality of the mirror.
- By alternately using the two methods, We works leaving almost intact the zone that is at 70% the diameter.
Obviously these instructions are for the use of a full tool diameter (= tool and mirror of the same diameter).
For the use of tools sub-diameter touch-ups are much more direct and intuitive, but there is a greater risk of delving too and locally, ruining the whole figure with "zonal" errors. So the use of sub-diameter tools is not recommended for novices, unless their precise purpose of study (on this very interesting and resolutive thechnique of work with sub-diameter tools, plese read many goods aricles and tutorials in this same bolog)..
PRACTICALLY:
Knowing that these readjustments affecting glass infinitesimal quantity to be removed, therefore it only lasts a few minutes, and applyng it, must be counted always full turns around the working table, with a minimum of one complete revolution if it is the case of not exaggerate with the deformations.
There is no rule for all important because there are many variables, of which the most incisive are: Hand pressure (to keep very little and possili absent);, hardness of pitch (too hard destroy the good surface; too soft create severe rugosity); room temperature (determining the quality grade of pitch to buy, no hard neither soft), compression of pitch on the mirror to provide a common curve well before starting each session (is most important thing), etc.
Each works independently so in its own way, and making the next test will realize if they worked too much or too little, storing its own considerations that will be used to judge and determine the type and duration mainly of the following tweaks.
It can be reassuring to think that at this stage, the glass so little rub off work, you can cancel everything and go back again and again a little towards the original sphere without harm to the mirror, to start yet another session parabolization.
The realization of the "Best mirror of the world" then becomes only a matter of time.
The skill and / or luck, they put “give us their do” to decrease the time, which remains within the reach of all those who with perseverance and skill, They have come up to that of the machining point.
Given that we think in millionths of a millimeter of glass thickness to be removed, and given the tolerances expressed in equal units, necessary to perform the finishing retouches, keeping in mind that a pitch too soft or too hard exaggerates respectively in too little or to much abrade; and that we need before starting a new remodeling, press down the pitch tool firmly with your hands against the mirror, to uniform his shape at these of the mirror, and finally we must never abandon for hours our tool on the mirror interposed with abrasive, This need is to prevent the occurrence of electrochemical corrosion that can cause a roughness that can diffuse the light by decreasing the contrast of the best mirror made.
Closed to digression of the known practices, we review the situation after the test n. 1:
TEST N. 1
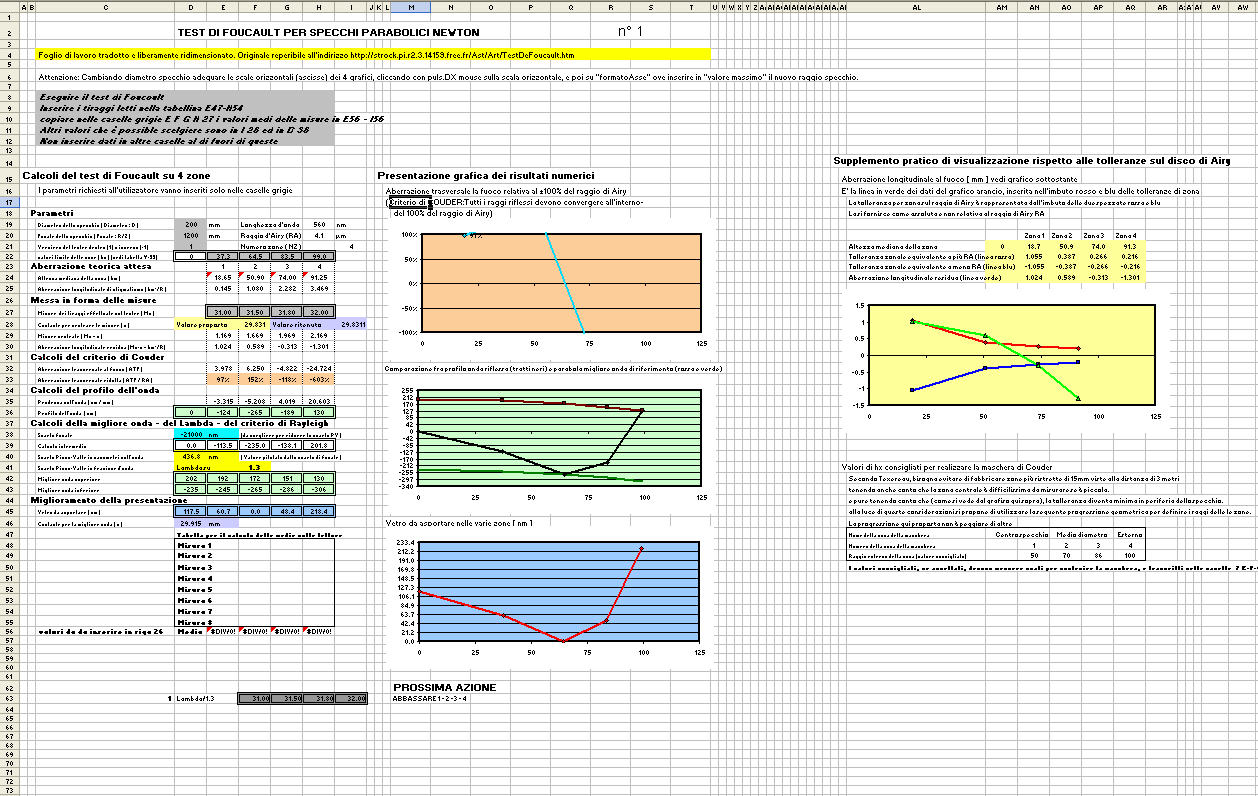
Test n°1
For testing we entered gray boxes E,F,G,H, 27, the four reading values detected and mediated at least two sets of readings.
At a glance we see at once from the chart “reflected wave” (a green background color), that the shape of the parabola that we are building has the trend of the black broken line, located between two copies of the calculated perfecto reference perable, which also represent the respective best reflected waves: one under he graph (in green); and one higher (in red).
The vertical distance between these two best waves, indicates the peak-to-valley difference reflected wave, expressed in nanometers in D40, (and given algebraically by H43 + H42) and also reported in a light blue background graph instead for the error on the glass, from orderly difference between the values (in H45) the area of the point of contact 2 in lower place, and the point of contact of the zone 4 in higer place, and it represents the maximum error that owns the glass surface of our parable at the time, compared to that of reference.
Now, the wavelength "Lambda" of yellow-green light of 560 nanometers indicated in H19, divided by the error of 436.8 nanometers tells us that our parable currently has an accuracy reflected wave of Lambda / 1.3 (Talking "Lambda on" 1,3).
As we see from the chart “glass”, blue background, that its maximum surface error is currently 218.4 nanometers high. (see box H45) , namely the half of the error on the wave.
NOTE: And this reminds us and confirms, that an error on the glass meets twice in the wave reflection, which then damages of a double error amount on the glass: The wave is then damages a first time while an impact on the mirror and a second time while emerges.END NOTE
Although at this initial point of the processing is not of fundamental importance to see which is the best lambda value that we have, because we are still far from a good parable. But in fact, it is good to know that the two reference waves, lower (verde), and above (Red), at each measurement, they will have the minimum mutual distance ( and therefore they give the minimum peak-to-valley error by maximizing the lambda / n), when they touch our broken black line, in one point, for one of the red or green parable, and in two points on the other of these (while now in our graph of green background we see that it touches only one point lower and one point upper).
The search for the optimum condition you do it manually by entering in the box on light blue background D38, chosen values (for default design of the spreadsheet) in a range that goes from -6883 until
+42645. Trying more values, We'll tilt the curve until one of the two reference parables go to touch in two points.
Finally, about the lambda / n we can still do the following small and banal reflection, However, indicative the test Foucault sensitivity, even if executed with our tester that is anything but a sophisticated machine: Our green graph paper has a distance between the two points peak and Valley of more or less 3 cm, while the error is represented by 436.8 nanometers high., This means that we are able to see that error invisible to the naked eye, amplified (30/436.8*10^-6 ) over 68 thousand times.
Returning then to look at the shape of our broken black line that shows us magnified the flaws of our parabola belonging to half of our mirror, with the center mirror on the left side of the graph, and the rim on the right hand edge: We note three things:
– We see that the central zone (at left hand) is high;
– And that the maximum depth of excavation is located between the lower zone 2 and 3, where the software advised us to take as a contact between our curve of reference. That point is roughly at the 70% the mirror diameter;
– and we see that the edge of the mirror is even more elevated of his center.
There just so this glance at the moment, to establish that the first retouch we will do lowering the zone 1 and 4 parabolizing for 70%:
That working first for deepening the Center (zone 1) with mirror in hand and tool below, as indicated in above "Defect-correction" table, with long strokes in W shape, max 4 / 5D for a certain number of minutes (where the edge of the tool is lightly lowered and remains only the center in contact with the mirror), and then reversing the position to hold the tool in the hand to lower the edge for a while 'time with strokes in shape of W and amplitude 1/3 very slow, not insisting a lot and not getting a 1 / 2D to avert the danger of dangling the tool, turning down the edge. Occasionally the "sacred books" advise doing some stoke running straight to regularize the shape form.
Finishing each retouching and washed mirror and tool, every time we put the mirror on his support in front of the Foucault tester, environment at a temperature as constant as possible, and wait to acclimatize to lose the heat of processing.
The period of acclimatization for the normal glass is at least 8 hour, While it takes less for Pyrex. This is because the expansion of the glass are expressed in millionths of a millimeter, lyke are also the measurement tolerances, and make no mistake resoundingly the measures, is absolutely necessary to allow time to take the glass of room temperature.
In practice the day after we perform the No. 2 test
TEST N°2:
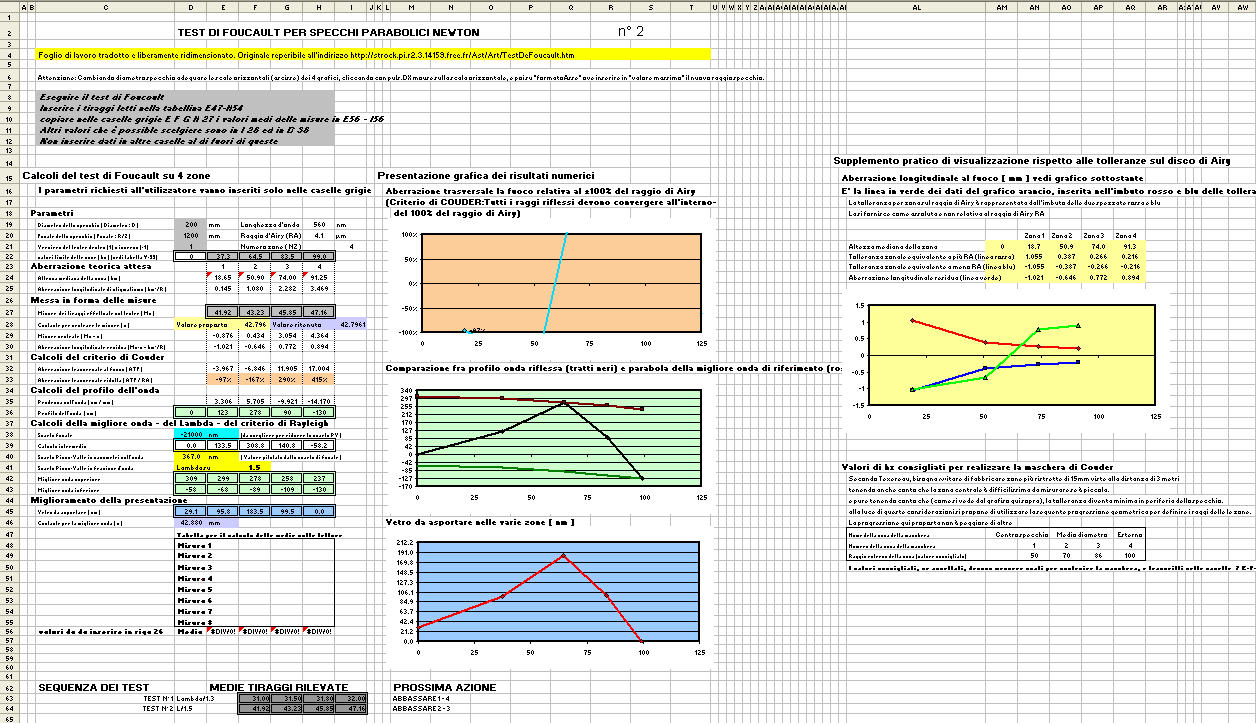
Test n. 2
We see from the green background graphic, we have lowered the center, but we overdid it by inverting the previous situation by breaking down the edge. Probably doing a job that lasted too long we are left with the only workable high part on zones 2 – 3.
The next touch-up will be directed back towards the sphere with a little strokes 1 / 3D coc. that will lower that cusp in the zone 2 e 3.
Then we execute the retouching and we put the mirror in acclimatization on test support, that we do test only tomorrow.
TEST N°3:

Test n. 3
We see in the blue background graphic, that we are somehow returned to the Test Condition No. 1, but with the considerable advantage of having significantly reduced the peak to valley distances and 270 nanometers of reducing them 40% (from 436 until 270) greatly improving the curve under construction.
But the problem remains that you should still try to further lower the center and also the edge, which edge however, is the "black beast" that have very narrow tolerances, that can make us fall into a new turned edge down, a little more difficult to retrieve, because working retouchs we have more and more the lesser amount of material available for the recovery, due to current condition improved from the minor difference with the reference parable.
(However, any new go back towards the sphere would not be a drama, except in relation to the loss of time required for error cancellation, and the recovery of a new good starting situation).
We then make a retouch for the moment only on the middle part, lowering it a little bit with the "Correction : Action "described in the table at the beginning of this article, the number 3, when you are in the presence of a "high center".
Then we execute the retouching and we put the mirror in acclimatization on test support, that we do test only tomorrow.
TEST N°4:
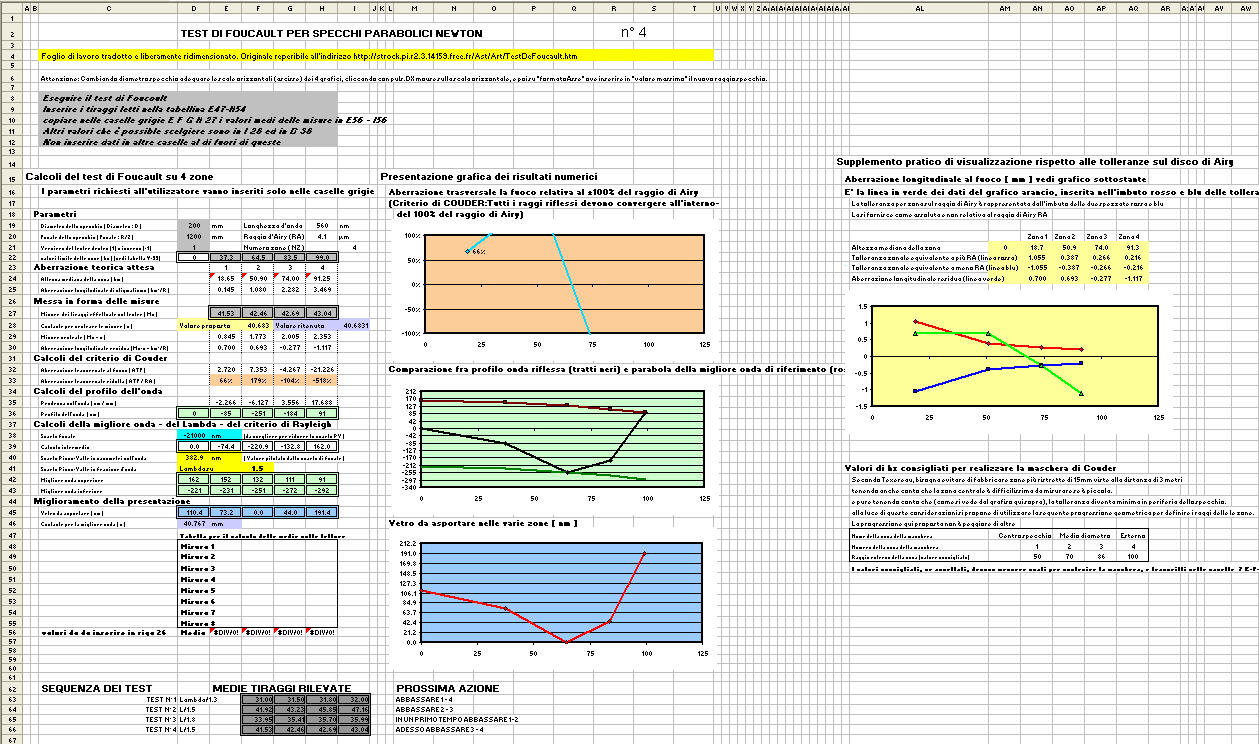
Test n. 4
We see from the graphs in green or light blue background, we have not reduced the top area in the center 1, but we went anyway to slightly reduce the height of the adjacent area 2, perhaps because we have not handled it appropriately we mirror to carry out more work in the area 1.
That reduction in area 2 It has temporarily worsened the values of the areas 1 e 4. But in the idea that it is always better not to overdo, we can be happy even with a partially poor result.
Like next retouch we try again next adventure to down a little the 191 nanometers of the edge up, applying the action number 1 (see above multiplication table) for some time, hoping not to extend too long the work order not to fall into the opposite edge retorted (Turned down Edge). And then re-apply the action number 3 to lower the high center.
Then execute twice retouching and put the mirror in the acclimatization on the support for testing, that we do test only tomorrow.
TEST N°5:
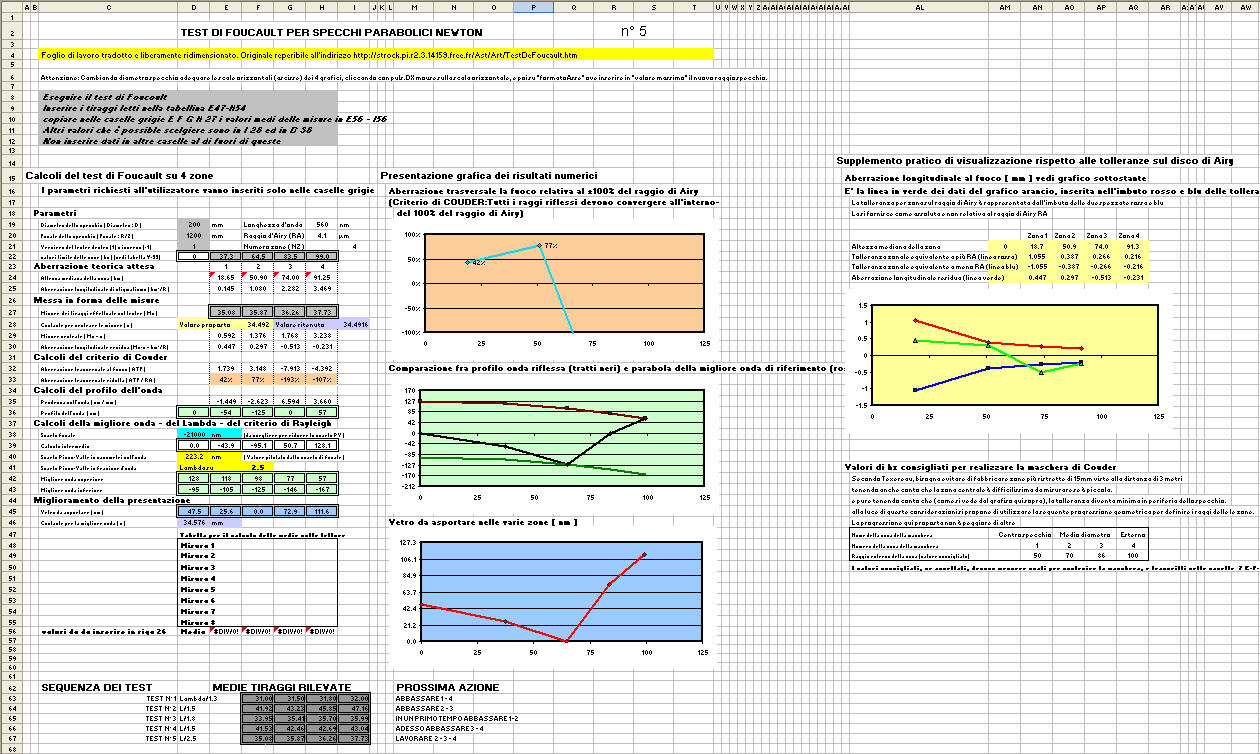
Test n. 5
We see in the blue background graphic, we have reduced the raised edge by 192 until
111 nanometers high., which is not so much, but it is prudent, and we content.
But we with action 3 also reduced the fine center from 110 until
47,5 improving peak ratio nanometers – from lambda/lambda 1.5 to Lambda/2.5.
Next we should try to touch up a little work zones 2,3 e 4, to reduce the excessive gap present. Possibly without incurring in a turned down edge (Turned down edge) in zone 4.
We will implement so a short action 1 on the edge, they plan to put the mirror down; and then we put the mirror over, and we will do an equally short-acting 3. And we'll see next time what happened.
Then execute the two touches and put the mirror in the acclimatization on the support for testing, that we do test only tomorrow.
Continued on next item number 8, (the last Foucault test the mirror 200F6), on the tests from n. 6 the final n. 10, with mirror finish.