With the previous article we saw the mirror 200F6 working with parabolization's corrections derived from five successive retouch actions and following Foucault tests controls.
With this article we will see the remaining 5 tweaks that will bring us to the end of the mirror processing. Obviously this course continues to be a likely simulation in which case You came to find anyone who has already traveled at least once, the way of manufacture of a parabolic mirror for space telescope.
For convenience we will continue to lean on to already seen Excel spreadsheets translated and adapted (whose provenance is indicated explicitly on the same), Although if any other program specific to the management of the Foucault test calculation, would provide equivalent results, with inserting in it the same source data.
Here again a reference to the rules of the game of the corrections mentioned in many reference texts, for easy understanding of the editing decisions taken from time to time:
DEFECT TYPE ->:FIX RULES
- Edge High: To work 5-10 minutes with mirror under, with strokes in W shape, 1 / 4D with a slight over-pressure of the hand on the side that are "over the border". Working in "over the borders", always pay a lot of attention to ever be absolutely rocking the tool will not fall immediately into the opposite defect of felled board.
- Turned edge down: Cut the pitch well at the rim of the tool, check the channels that are well open on his surface, work with mirror under and with strokes 1 / 4D. An hour of work would retrieve 1mm draw at the edge.
- Central high: With mirror up, work above the center on the 2 / 3D tool with small strokes in W shape 1 / 4D, counting to recover 1 mm aberration each 5 minutes of work.
- central Hole: Strokes 1 / 6D with two wets with mirror up against one at mirror down. The efficiency would be an hour of work for each 1mm draw corrected.
- Center hole and turned edge down: The mirror is no longer spherical (and his shaper may be tend to hyperbolic or parabolic or elliptic), You get these bad shapes by making polishing strokes too large. Verify also that the pitch is not too soft, trim it to the exact edge of the tool. Making strokes in W narrow at the center and 1 / 4D alternating mirror above and below. In this way the work abrade the zone to 70% Diameter, and returns slowly back to a good sphere shape.
- For any zonal error: You can go back to the sphere with strokes 1/3D center over center alternating with mirror above, and after below..
We must also remember that on top of these rules applies more generally the speech:
- Acting with the mirror above and tool below, They abrade and deepens the mirror Center, leaving almost intact the border.
- Using the mirror below and the tool above it, it abrades and deepens more the edge of the mirror, leaving the center intact. But be careful because (with strokes too larges out over the borders) it is easy to break down the edge that always has a narrow tolerance with respect to the center, and is a defect that must be corrected because it will void the quality of the mirror.
- By alternately using the two methods, We works leaving almost intact the zone that is at 70% the diameter.
Obviously these instructions are for the use of a full tool diameter (= tool and mirror of the same diameter).
For the use of tools sub-diameter touch-ups are much more direct and intuitive, but there is a greater risk of delving too and locally, ruining the whole figure with "zonal" errors. So the use of sub-diameter tools is not recommended for novices, unless their precise purpose of study (on this very interesting and resolutive thechnique of work with sub-diameter tools, plese read many goods aricles and tutorials in this same bolog)..
It should also be noted that before starting any retouching, ALWAYS necessary to perform the pressing of careful adaptation of the tool pitch, against the surface of the mirror. The pressing is made indispensable and required from the rerstricted tolerances in game, which go to be reduced drastically as the mirror quality improves.
Always remember the importance of the pitch hardness which must work to its nominal working temperature. A pitch too soft or too hard have much ease in generating zonal errors on the mirror.
Closed the introductory digression, We see the situation test n.. 5 that ended the previous article and remodeling decisions taken at that stage:
TEST N°5:
Test n.5
We see in the blue background graphic, that with retouching # 4 had reduced the raised rim from 192 until
111 nanometers high., which is not so much, but it is prudent.
But by applying the “Defect : Correction” n. 3, we also reduced fine the center 110 until
47,5 improving the Pic to Valley ratio from lambda/1.5 to lambda/ 2.5.
As a next remodeling we had declared to work a little the zones 2,3 e 4, to reduce the excessive gap present. Possibly without incurring in zone 4 in an turned edge down error, implementing a short-acting “Defect : Correction” n.1 on border mirror; and then putting mirror above, implementing an equally short-acting “Defect : Correction” n.3.
Then run the two tweaks and put the mirror in the acclimatization on the support for testing, we had expected the next day for the next 6 test run to see what tweaks have changed.
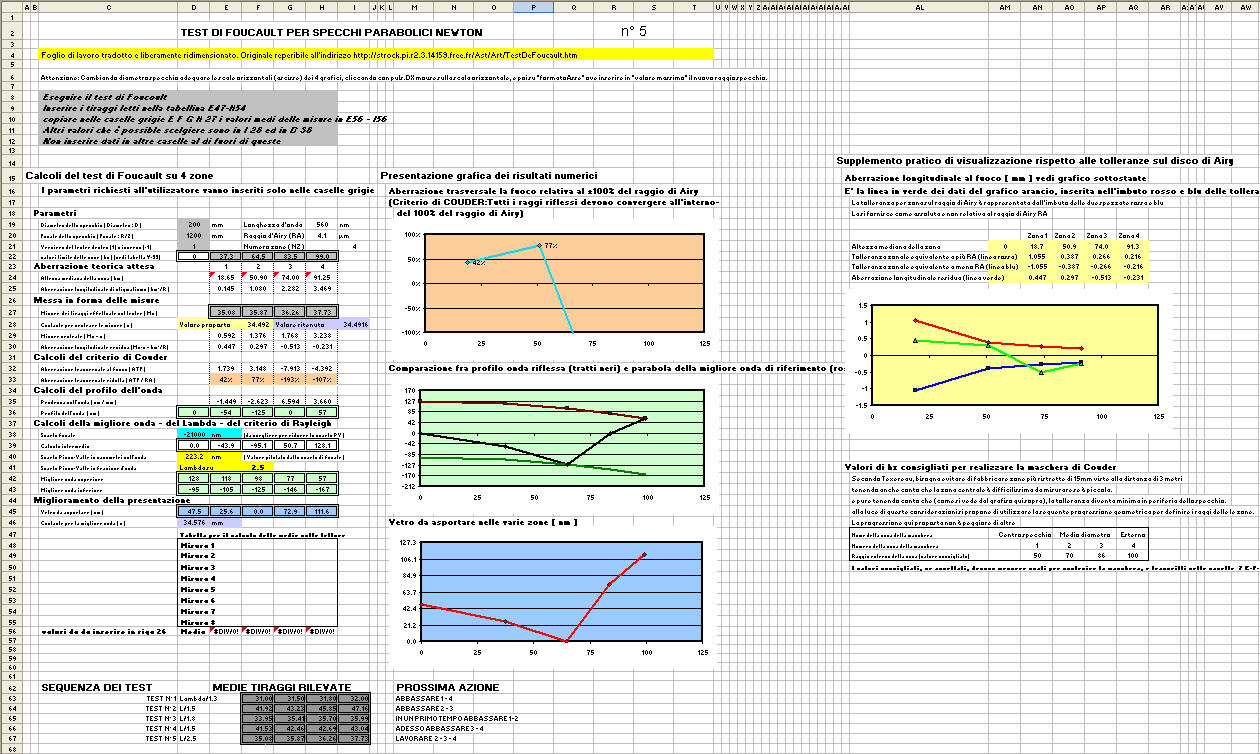
TEST N°6:
Test n.6
The graph usually green background, We see that we have worked well by lowering the rim without putting it down, and good lowering the center. With the obvious result that we now find ourselves a high zone 2, that obviously we have less touched .
Of course in the Green chart, we also see that the work we do in the continuous attempt to lower the "high" zones of the chart, means that decrease the distance between the two reference best waves, that we remember these are the green copy (the lower), and red copy (the upper), of the reference parabole, that defines the error "peak to valley" of our parabole, represented by the black broken line..
In fact in box F41 we find the error value peak-to-valley is now Lambda/4.8, that tells us that our mirror "would have" from now ( and except effects of future touch ups errors) successfully passed the threshold of acceptability of the quality , established by the lambda/4 error on the reflected wave.
But the only good lambda achieved is not sufficient to declare the mirror “diffracion limiterd” due to an important and different news that we see at once:
If before this time we have left out other evaluations of our excel sheet (that in the logic of things, by initially marginal become increasingly significant way), at this point it is interesting to look at the graphic orange background that expresses the values of the orange boxes E,F,G,H 33.
In that graph, the vertical axis interprets the "Airy disc", and shows us fall inside, the points of zones which meet the Couder criterion, According to which, all rays of light reflected from our mirror, must converge within the radius of the Airy disk, in order to form the perfect and canonical diffraction spot and rings, namely, that presents the bright central point that contains the 84% of the light, and in the first and second ring only 7%, and the 3%.
radius, Airy (or Airy diffraction mark) which is in fact the power separator of a telescope (that is the theoretical limit of resolution of an intrument) and in our mirror 200F6 it is indicated by the value in the box H20 4.1 microns, derived by the following formula:
Radius of the first black ring = ( 1.22 * Lambda 560nm )*focal ratio F / D
Where lambda is the wavelength (box H19) the yellow-green light that the human eye is more sensitive (560 nanometers high.).
If one or more zones reflect out of the Airy radius , this spot would no longer have its canonical form, because the light would be shifted and diffused from the center to the rings, creating a enlargement and weakening of the central point (and then and a reduction in the “pinpoint” of the stars), In contrast degradation at expense of the instrument, that would have basically some difficulty to show fine details and "detachment" the feeble stars from dullness “Back ground” sky", that might well get away if he had the support of all convergent zones in Airy disk.
At this moment, in our mirror , is our zone 3 going to fall off, in the point at 211% over the upper edge of the graph.
For the same reason it is also interesting to look at the other graph in a yellow background, that shows how our broken line for the Couder, criterion is posed in respect of the manufacturing tolerances of our mirror, showed as the "funnel" formed by the two curve-tolerance limit, upper red and lower blue.
Funnel, (or trumpet showing his pavilion) (on widest part) at left hand, where there is the center of the mirror.
Large amplitude that expresses large tolerance in that point, given the low variation in gradient of the curve near the vertex (center) of the parabola. And the graph shows that the tolerances gradually shrink with the funnel continuing rightward, where you arrive at the edge of the mirror, and where the curvature of the parabola has the maximum variation gradient.
Even in the graph with yellow background, we see the zone 3 up and out of the “"trumpet bell"” of the tolerances.
But now we return to foresee the
NEXT RITOCCO:
We establish to lower the center, involving in preference the zone 2, applying the fix # 3, but accompanied by a slight over-pressure of the right hand when it passes over the zone 2
We perform retouching and we put the mirror in the acclimatization to tomorrow run test n. 7
TEST N°7:

Test n.7
Even the 7 test is positive.
We have well reduced the zone 2 losing slightly on the lambda, by the fact that in improving the zone 1 e 2 We must obviously made “more distant than before” zone n. 4 ... that, since we are now near the end of works (... in the sense that we have all our parable within a "small error" of only 60,2 nanometers high.), we will have to improve, face the difficult zone 4, lowering, if everything goes well, to splash the "oxygen of double-digit".
But unfortunately, we run the risk of lowering it too, and then having to do "game over", and return to the sphere to start a new parabolization.
The next retouching will be so very cautious about the zone 4 applying the correction type 1…..remembering that we must take away no longer than 60 millionths of a millimeter… in zone 4, (…and pressing pitch by adapting it, is crucial, as well as the advice that do not load the tool with the weight of the hands (in this case we have to move the tool only pusching it from its edge), when not in use localized pressure).
We perform the delicate and limited touch-up and we put the mirror in acclimation to run the test No Tomorrow. 8
TEST N°8:

Test n.8
The result was good although we still have some work’ too long, producing a slight edge turn down. Looking at the chart on the yellow background of the tolerances, We see that the first zone 4 down quite a bit out of tolerance; but now we see that it is out of the opposite side, However, climbing very little to stay only “border-line” with his tolerance.
A slight improvement is also shown by the oxygen that has risen from 4,8 until 5.
But as far as the criterion of Couder (graphic orange background), the zone 3 is fell by improving, while the correction has put in “off-side” the zone 4.
We proceed with a touch that lower the zone 2, and from this lowering, on the graph on green background should slightly rise automatically the zone 4 (while on the yellow background graph, the opposite should happen).
We perform retouching and we put the mirror in the acclimatization to tomorrow run test n. 9
TEST N°9:
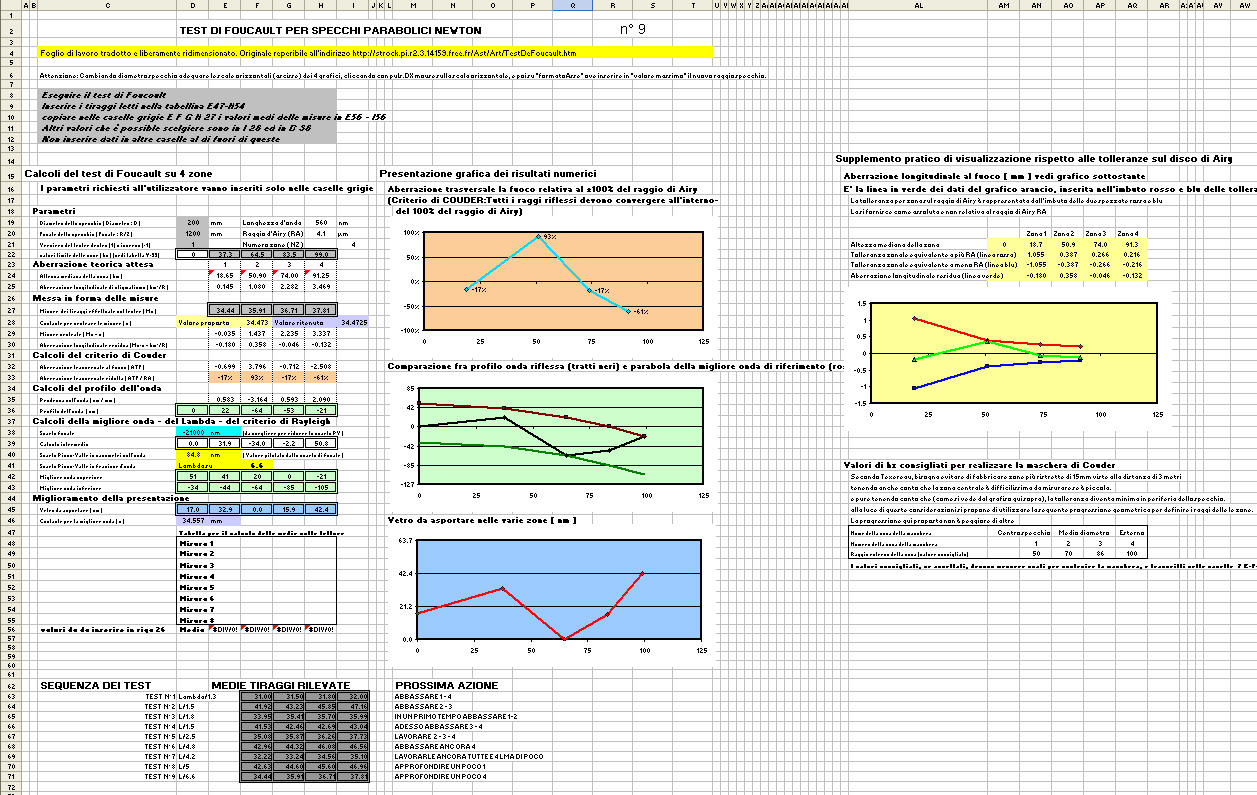
Test n.9
We see immediately from the green background graphic that the distance between the two best waves , copy of the reference parable, It decreased significantly, bringing our Lambda / value 6.6.
We also see that improvement did fall into the Airy diffraction radius (graphic orange) even the reluctant zone 4, in addition to 3 previously recovered; but the zone 2 It has shifted almost borderline, while remaining within the tolerance “inside of”Couder criterion.
So our mirror is a great mirror because it meets all the technical requirements, and we might even consider it done... But since it is a simulation, There is no fear the possibility of virtual damage our current parable.
Then imagine working the mirror over the entire surface for a very short retouch, counting to lower smoothly and slightly the protruding "peaks" of the zone 2 e 4, applying, with the mirror in his hand, for first time the fix 3 with slight overpressure of the right hand on the zone 2, as previously done; and then taking the hand tool and apply the correction n. 1 for only one table revolution, taking care not to exert any pressure.
Let us keep in mind that our current positive maneuver is limited only 42,4 millionths of a millimeter (see graph on light blue background).
We perform retouching and we put the mirror in the acclimatization to tomorrow run test n. 10
TEST N°10:
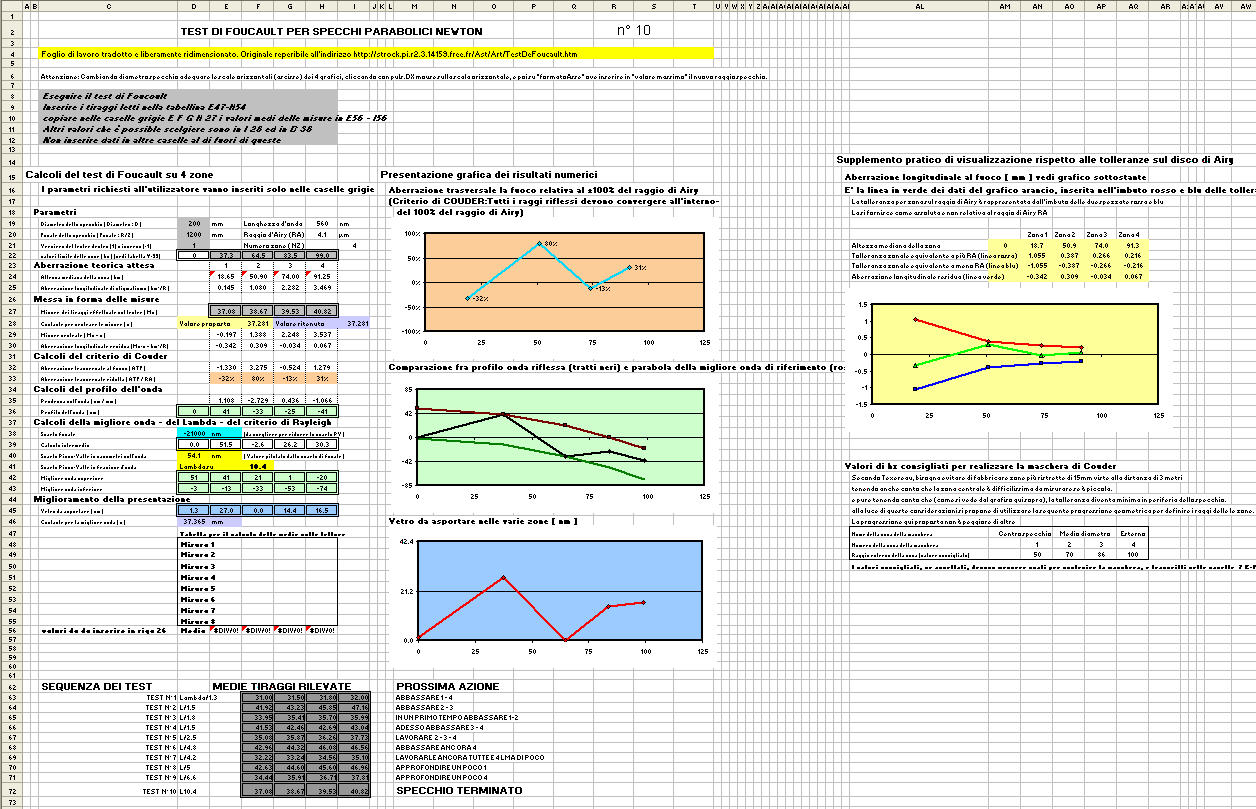
Test n.10
Looking at our worksheet we see, from the Green chart and from the number in F41, we have reached a lambda /10.4.
And also looking at the chart in orange background, we see that the Couder's criterion is satisfied because all four zones of our mirror are reflecting within the 100% the radius of Airy disc. And also the chart on yellow background tells us that our four zones are inside the "funnel" that indicates the machining tolerances, the center mirror (at left hand), to the edge mirror (to right).
The zone 2 (see graph on light blue background) It could still be lowered to about ten nanometers with some “ turn with a thumb finger ” used as a tool, to bring zone 2 at the same level of zone 4 and pulling literally "skyrocket" the lambda value. But at this point it is not worth taking risks to have to make a “game over” for Turned Down mirror Edge.
Very high risk at this time that we have all our reflective surface within a maximum error of only 24 nanometers high., which also represents our “maximum leeway” for corrections...Passing that, we would have exhausted every raw material at our disposal for working, however damaging to improve.
It would be almost unforgivable having to go back to the sphere by deleting all the work done, to start all over again with a new session of parabolization.
Let us "give a “five"” alone and drink a toast to the event, sending to the aluminization what is surely a perfect mirror having high-contrast, that allow you to see details very faint but so well etched, and not faded as compared like normally we see the same in the commercial telescopes manufactured industrially from the perspective of saving time. because industrially saving time is saving money, while this is NOT a goal for the amateur astronomer "glass scratcher".
I conclude with a UPON MY PERSONAL:
At the beginning of my adventure of modest self-taught "glass scratcher", Although only proud of my true study on two known French and American textbooks, I wanted to find an instead "not to be found" PRACTICAL EXAMPLE, like the one that ends with this article.
I therefore hope that those few who come to read up to here the previous articles on this topic, can take safety and benefit from having followed me in their identical adventure, which was also one of my, bearer of greater satisfaction.