- This topic has 178 replies, 6 voices, and was last updated 3 years, 7 months ago by
Giulio TiberinI .
-
AuthorPosts
-
15 November 2016 at 14:56 #8989
Unfortunately in my case I'm using just the sub-diameter tools ... so I will surely have some surprises to be corrected ...
The old saying “all roads lead to Rome” It is also valid for Grattavetro.
In the sense that the curve of the surface which must be a pseudo uniform sphere, in order to be positively parabolizzata to within the tolerance of the greatest defect peak / valley equal to or less than lambda / 4, it can be rough in any way.
Some artisans reach the arrow using a diamond cutter cylindrical cup mounted on the tilted head of an old rotary table milling machine. But then that surface certainly not spherical will still be unified using a tool plaster with stoneware tiles or drowned steel hex nuts on the face that will perform the processing, but the complication is that it is not transparent as what would have been in glass, and then proceeding to the unification of the surfaces, you can see the achievement of the goal, constituted by the disappearance in transparency of the air bubble that remains until, complaint different curvature mirror-tool.
What really matters is that once you reach the desired excavation arrow will continue the unification of the entire surface work using a full tool diameter, and the famous racing with ooze forward-backward 1/3 D center on center and null lateral swiveling out, until it does not disappear the aforementioned air bubble.
In the absence of transparent tool you will make marks with an indelible marker on the entire surface of the mirror, to see on which zones they would not be removed after performing a dried. Conversely, when all the signs are removed is a sign that the tool and the mirror have the same curvature
From that point on, the task will only sharpen the surface roughness to prepare for polishing.The General Council of the “sacred texts” in the field, to perform the roughing tools with full-diameter glass with chordal racing, It has the sole purpose of ensuring everyone a uniform result of the spherical curve.
16 November 2016 at 1:21 #9011hello Giulio,
definitely roughing and working until the end of a mirror of this size there would be many more pros using a hand tool diameter…

To get close as possible to the shape of a sphere'm trying to keep controlled the height of the arc in all its points with a distance of about 1 cm from each other…since now the excavation that I have generated much reflects the shape of an arc…almost certainly I will have some areas to be roughed at the end but I have to wait for the verification of a first Ronchi…
Now if i ran a Ronchi test surely would find a central hole a diameter cm…this is the only fault I warn passing his hand on the mirror…(probably for now I'm wrong ) however, it does not seem a big deal,I correct him along the way so I still miss 1,2 mm for the final arrow…
They are much more concerned about running into other problems…(one case : astigmatism )
)As soon as I can execute the test…I'm very curious!
We hope that you have not made a mess O.T.
Have any of you used the IR filters to observe the sky during the day??thank you!!
 10 January 2017 at 22:11 #9262
Happy New Year to all the forums!
Here I am working to update my mirror after about three months reached the desired height or nearly…I still miss 1-2 tenths to end the spherical part.

I have performed a test for the curvature radius of the control and measurement roughly corresponds.
But I find a problem I have to solve, it concerns 3-4 scratches that do not seem deep, probably fall in the tenth of a millimeter or maybe less I could not say exactly!
I am currently working with the grain 320, I do not know if you go back to 150 remove the scratches and then return with the finer grits…or continue so.
The sooner ronchi execute a test to check if the mirror is truly spherical or if it presents the possible defects to be corrected.
If you exceed the height of the arrow established can be remedied? Any advice is welcome!!
Thank you!
10 January 2017 at 23:04 #9263hi Luca.
Watch with a powerful lens the width of the scratches and compare it with the size of a grain of abrasive grain 120 maybe you used previously (which on average it is a tenth of a millimeter, ( that means 100 microns).
If the two measures are similar you may delete rows coming back to a grain that is approximately half the width of the scratches. This is because it is more efficient the use of an abrasive grain which is half the width of the defects to be eliminated.(The fact is that in order to eliminate from the lines 100 microns with current grain 320 with his 18 or 20 microns, would you take a time at least 5 times higher than the use of the right grit).
That go back to the mid-grained scratch, I would also convenient to insist a little in order to eliminate those 2 tenths still separates you from the right frecciqa. Why to remove them with 320 it would still double the time it would serve to remove scratches.
A common mistake is precisely that of not reaching the right arrow at the right time, which would make it impossible to do away with the grits finer way.
If it exceeds the arrow is sufficient to reverse the mirror positions and tool for “come back”. And consequently for keeping the arrow unchanged over time ocorre reverse mirror-tool positions to each dried, as you will need to do very often being parabolizzazione.
I think in respect of the above will be useful to read this article:
But perhaps it would help also read the other three of the same series, for guidance on reversals that I mentioned, and other tips that would take you away from always the easiest mistakes with narrow tolerances hand in hand with the progress of work.
11 January 2017 at 9:23 #9271hello Giulio!
Thanks for the quick response!

In my case I am making use of a sub-diameter to work on the ball, so I have not the possibility to reverse the tool with the mirror to correct the height of the arrow…alternative?
I do not know if your guides also speak of working with sub-diameter however, will give him a look tonight so maybe I will draw some solution to avoid possible errors! To quantify the depth of the scratch I have available a 10x lens…you believe is enough?
11 January 2017 at 10:39 #9275If you use sub diameter you can just continue with that.
In fact my guide would serve only to get an idea of’ andanmento general processing and difficulties to watch.For a scratch depth of about one-tenth (which it is normally such as to be “Heard” passing a fingernail above), that should be enough lende.
For the remainder of the processing on the finer grits (that requires you to check whether the leave craters from previous grains have all been smoothed, before moving on to a grained more fiine), I would agree guardae in the local markets the stand of some Chinese, looking into a microscope like this from 100 lighted magnification with a LED, costing about 10 or 12 euro, and also it has a network inside the eyepiece divisions 2 cents.
11 January 2017 at 13:43 #9277Ok Giulio I will as soon as possible to buy a small microscope
thanks a lot!!
16 January 2017 at 21:19 #9324Then deleted lines…Now the mirror is not more flawed!
However, it remains to be decided for another problem that sends me a bit’ bush out…the mirror presents a burred edge eating me about 1 mm per side and then, in essence, my surface is no longer useful 41 but 40.8 cm…I realize that 2 mm Mirror lost are not many compared with the overall size, although he is still surface I could use, not to mention the fact that in this way I should dig even around the mirror for another half mm if I want to remove the barb.
Usually at the end of polishing is left a small border drooled?
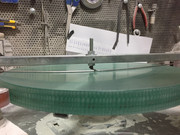
Meanwhile, I also got the small microscope recommended by Giulio just waiting for it to be delivered to me as soon as possible!But here I'll show you my method used to reach the ball corresponding to the marked arrow to this mirror….I made a kind bow / crossbow using an iron rod about one mm, bent at the center by a pin which is adjusted in height!
Obviously I just need a guide to see where to eat well mirror the final result will give the Ronchi! 16 January 2017 at 23:20 #9329
hi Luca.
For the distance from the edge, calculates that usually is greater than your, since it is made from the usual indispensable bevel at 45 ° of at least 2 mm seen from the optical axis (…And this means that the length of the tilted facet is 1,41 times greater).
And the more 2 or better 3mm initial chamfer dwindling up to about 1mm in surviving mirror finished.The chamfer in the normal processing must be regenerated because they never disappear.
In fact its presence is the only way to minimize the occurrence of the edge mirror splinters, that when it is consumed by machining, They are easy to appear.
Your method of achieving the arrow is ingenious, and that central pin which pushes the crossbow more easily lead to the parabola rather Ball.
This can be handy, but when at stake are the nanometer, It entails the risk that then the machining exceeds the parabolic curve to a hyperbola, and needs a little work to get back to the ball.As I said, all trade “lead to Rome”, even though they often are longer than the more efficient but awkward big tool.
But the real fact is that one can remake the parabolizzazione thousands of times without affecting the realization of a mirror with the patience and perseverance will be absolutely perfect.
In fact, every “game over” reverting ball to retry the new parabola, It involves only the loss of a few millionths of a glass millimero.
17 January 2017 at 0:56 #9330As at the end of the mirror should remain around 1 mm then should I still dig a little’ so the edge thins a bit’ more…
Working in the mirror so that I have chosen has greatly lengthened the time (as indeed I had anticipated)however, the most important thing is that I can finish the lens…the time taken does not scare me because I'm not making a great effort to work it…indeed it has become a fun
From calculations made once I managed to reach the ball, parabolizzare for the mirror they will need more 15 micron of excavation…we hope well
Update as soon as possible!
Thank you!!
25 January 2017 at 11:58 #9383I have reached the desired arrow…but the ball is still a little’ far!
I thinned to fine the glass edge and this earned me a little more surface…I would say that currently the edge turns out to be of about half a millimeter per side…
Taking a focal control (which matches) and looking good reflection I noticed that the center appears to be a little’ dug more…I find a central circle of approximately 4-5 cm in diameter…
I tried to get over his hand but it makes it hard to tell the difference,
I'm trying to dig a little’ all the glass with vertical passed without touching the central part to bring it to the level…I'm using the grain 150!To post a video like you do?
@Giulio
“Some artisans reach the arrow using a diamond cutter cylindrical cup mounted on the tilted head of an old rotary table milling machine. But then that surface certainly not spherical will still be unified using a tool plaster”
Maybe I need to start considering the idea…if they do not resolve with the sub-start work diameter I to create a similar tool so shorten the time for the ball!
If I understand correctly I should use chalk on the mirror surface, creating a kind of mold / right shape?!Regarding the Ronchi test a traditional tungsten lamp okay, or it takes a specific lamp?
25 January 2017 at 16:14 #9397– Half mm on the edge is too little. The double may already be scarce, but it may be fine if we can keep it so until the end.
This is because with the large number of dried need to do to refine the sphere and the surface, the risk of edge chipping is almost certain. And to avoid those nicks on the reflective surface of the edge (which is the most important and determinant of the performance of the mirror), usually we finish the job with even a chamfer on 2mm (that is, with reflective diameter about 4 5mm or less than the diameter of the mirror glass disc.– The condition of “central hole” It is normal in scratch the glass.
With the hand is hard to feel that a step, though infinitesimal, But is a big flaw easy to remove.
I would recommend you try to do what makes John Dobson, Looking for a minute and a half the following movie, starting from 14 minutes and 50 seconds from the beginning..
Indeed, he looks at the grazing reflection of the sky in the wet mirror to identify the diameter of the central hole like your, and then with a drawing explains how to delete it in half hour of work.To make a tool plaster you have to cover the mirror with polyethylene Domopak; arrange on a polyethylene grid of rows and columns of spaced stoneware piastrelline 5 or 6 mm, looking at the center of the mirror does not fall either in the center of a tile, nor outside it.
Then writing a cardboard band around the mirror to make the gypsum container, coli and chalk in a thickness of at least 3 cm or more, to avoid that might break (or if you do not use the recommended plaster dentists, much more robust than normal plaster or tile glue from Keracoll) There drown inside a metal net of a mesh from 1 cm, reinforcement). All epoxy painted to help stoneware held, and to make well-waterproof plaster.
– I am not an expert of Ronchi but I'd say that fits any lamp from an ordinary LED. (because when you are in the center of curvature of any point light illuminates the whole surface of the spherical mirror).
25 January 2017 at 18:46 #9403hi Luca, unfortunately the Ronchi test you can do so only with the glossy surface or partially polished. With the mirror in the grinding step, even if you're working with very fine grits, the test is not feasible, even wetting the mirror.
25 January 2017 at 18:55 #9404To post a video like you do?
It must first be uploaded on youtube ( or Vimeo or any hosting that is designed for video file uploads ), then copy / paste the video link in the post.
25 January 2017 at 22:13 #9405Hi Massimo,
I tried copying the link to Vimeo but I did not uploaded
After I try again For the Ronchi test'm waiting to get a nice shiny surface…
What interested me most was whether an ordinary lamp goes wrong or I have to use a specific lamp?! -
AuthorPosts
- You must be logged in to reply to this topic.