Forum Replies Created
-
AuthorPosts
-
hello Giulio
thank you for the tip. I didn't actually try to use the telescope fearing that the secondary supports would prevent the test.
I hope to succeed, next week, to terminate my tester. I have all the pieces now, I just have to find the time to assemble them.See you soon
AI don't have a clear idea of how the image post works but it seems a bit’ little one posted above (I followed the instructions but I can't click anywhere to enlarge it). I try to put the direct link: https://i.postimg.cc/TPm8JJkr/20210727-084851.jpg hoping it works
good morning ladies and gentlemen
first of all, thank you again for all the advice I have scrupulously followed in “to design” he test.
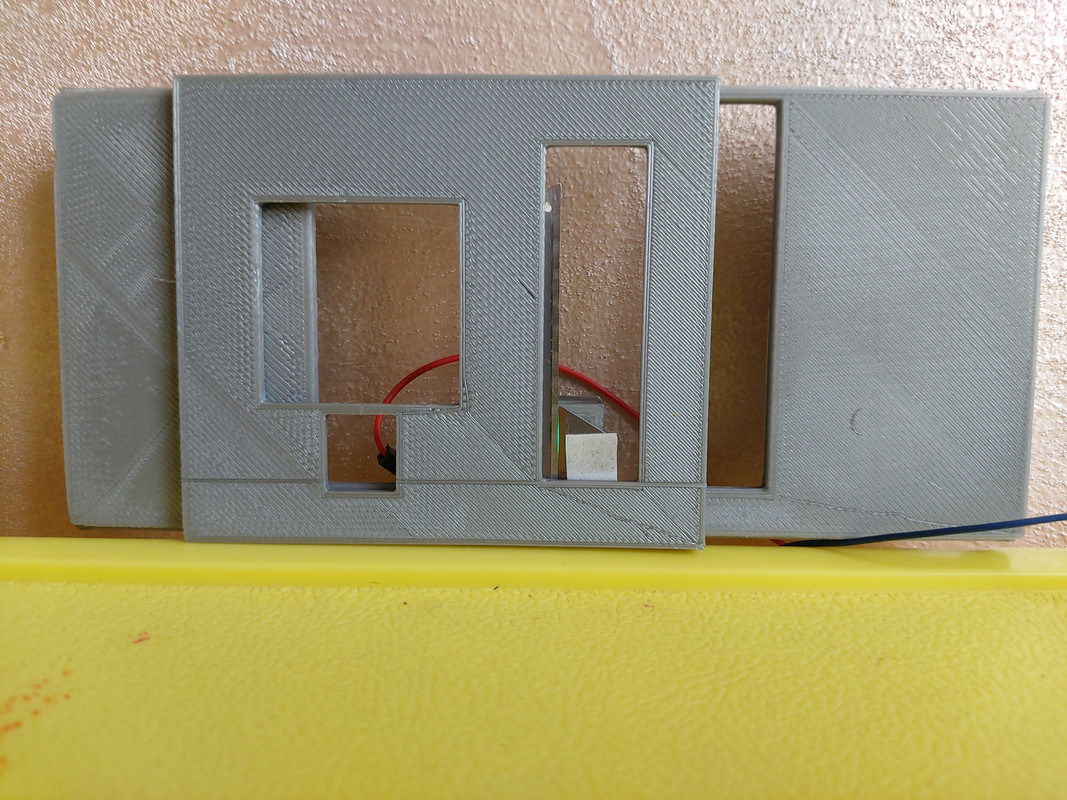
Unfortunately, I didn't have too much time to turn the project into object, and what little I managed to do I have not had the opportunity to test it since, Attila, which is not my son's real name but it should be, as soon as he sees a tool, he mistakes it for a Roman camp… On the other hand, I managed to mount protractors on my Dobsonian. The supports for the hands, li ho stampati 3d, mentre i goniometri Az / Al were printed 2d on paper and pasted on cardboard. Within seconds I was able to aim for M51, glimpsing something (I fear my 150mm won't allow me too much… ) and I would say that the aiming system works with dignity, considering the time invested. To do the math on the fly, I also made an android application (an exercise more than a need) works , chosen as a reference the object currently pointed to, it tells me in real time how much to vary az and al to point to the new object.Anyhow, returning to the tester, i managed to print 3d (I draw at night and the printer is inaccessible in the autumn) the mask where I placed both the openings to view the mirror and the blade support (those of a cutter properly rubbed against the glass) which I use to get the crack. They are mounted on a slider, bound to the mask, which allows me to easily switch from the Foucault configuration to the Ronchi. I would have liked so much to disassemble the primary 150mm 7.8f of my dobson for “see the effect it has”, but I was afraid to finish the test without even a mirror (all 16 the puppy wakes up). Then, just to understand what happens, I electrified the slider with a green led (it seems to me a 3v 60 ° that I had bought on another occasion) and I pointed the mask against a wall, at a distance of a few decimetres, otherwise you could not even see the LED light. A figure has formed which unfortunately I expected but which I do not understand if it is correct for the purposes of the test. It more or less consisted of three vertical fringes “|||”. The central fringe, clear and rather defined, it was clearly that of the cleft (obtained using a thin film as a thickness gauge, very thin, than what I had – I have not found a magnetic tape but I will get it) while the other two external ones were more or less shaped like “D” (right) and of “D mirrored” (left). Geometrically the thing comes back, but I wonder if the result is correct and if something is not wrong. What do you think about it? There is a way to understand if I am on the right track without disassembling the primary (which I will do next episode but I would like to get there ready) in placing the blades and creating the slot?
As always, thank you and forgive me for all these questions, but the short time forces me to try to get ready for the practical work sessions and to have to minimize the experimentation in the field.
Alberto
Below is a photo of the mask and the slider with the blades (no Ronchi)

Thanks for the replies…
as soon as I have a moment I will read them with eager attention. I had already read the contents of the linked pages – and many others, however doubts remained. Already scrolling through the text of your answers, I know I have to foresee the crack
I count this weekend to be able to dedicate a few hours to the project and then finish the construction of my R-F tester. Then if I can finish it, I post it, if I find out how…
Thank you very much and see you soon
Ahello Giulio
Thanks for the explanation.
In fact, data and information are still being collected. Rather, let me share the sequence of notes that I "took".
In particular I am trying to understand the correct sequence of operations at least to get to the glossy sphere. I need schematics… otherwise I get lost in options .
It seems clear to me that the use of a car will be necessary and that probably the best way (always at an amateur level), at least as more documented, is what you indicate of the "fixed post" even if many, I saw, they use a machine equipped with an eccentric. The path imposed by the eccentric on the tool is some arc of circumference, if I'm not wrong.
Let's say that because of the idea I got, without going into details, the steps in case of using a machine, will be these:
1) Mirror smoothing (I think this is what I do). In case of meniscus, regularization of edges and convex surface (and I do it myself with a full diameter concave tool).
2) Mirror edges smoothing.
3) Rough excavation of the sphere, if blank flat or even if meniscus but "quite" deformed with respect to the sphere
until . Macchina Fixed Post. With toroidal tool, extremely rigid, not consumable (for example steel disc, pulley and so on) with a diameter equal to half the diameter of the blank, positioned so that the edges are tangent, being careful not to exceed the desired sagitta. In this case, I suppose considerable pressure can be exerted, perhaps limited only by the power of the motor which may possibly not be able to rotate the blank-tool pair.
b. Macchina Fixed Post. With consumable tool with radius r equal to 70% of the blank radius R, offset by a certain amount (R-r) + 10%R[mm]<x<20%R[mm]. In this case the aim is to hollow out the concave blank and the convex tool, so that the surfaces obtained sphericize each other. I think this is the best approach in case of a deformed meniscus.
C. Machine with eccentric. With sub diameter tool, style diamond cup cutter or similar. Full diameter center-to-center pass, minimum transshipment. Again, I suppose considerable pressure can be exerted, perhaps with lesser limitations than those in point a as the contact surface is smaller. Perhaps it is the fastest way to excavate the approximate sphere. Be careful not to exceed the sagitta.
4) Refinement of the spherical excavation. In the event that a non-consumable tool was used in the previous activity, or the already built tool has worn out too much, the tool will have to be built using the spherical face of the blank as a "mold". Otherwise, the point tool will be used 3)b. During the refinement, the tool will be positioned on the mirror in the manner described in 3)b, taking care to loosen the blank stops to a minimum to allow micro-displacements (it should help prevent astigmatism).
5) Sphere polishing. Tool construction in pitch, starting from the mold of the concave face of the blank, pressure - heating - techniques to reconfigure the surface of the tool after the polishing session? Tool dimensions: full diameter of the blank or slightly less (70%)? Little pressure, reduced speeds, frequent checks.
until . In case of Fixed post, see point 3)b.
b. In case of machine with eccentric, as random as possible but without exceeding the edges too much.
This is a bit of the operation that I imagined after reading here and there, but please, if I'm wrong somewhere - or anywhere – feel free and be kind enough to correct me and above all extend each point with new content (my m is not laziness I'm afraid of writing unspeakable filth).
Last thing (unfortunately or fortunately you can find everything online): the rotating table of the machine, what I do? I have read from steel to aluminum to Corian, to marble to MDF ... If it goes well, the latter is clearly the fastest and least expensive thing, maybe properly painted etc etc ... . In the end, I don't think I'll open a parabolic mirror shop, so it must last in time to create my ...Thanks ∞
AlbertoHi Massimo, Giulio
Well, meanwhile, thanks for the immediate answers, better than any helpdesk: you can see that there is passion!You do well to point out the difficulties, probably insurmountable, of such a realization on the first try. I will tell you, actually I was thinking of a Ritchey-Chrétien but I don't know why hyperbole scares me more than the parable
.
In any case I will have to think about it a lot. My problem, like that of almost everyone, it is time and the fact that the workshop where I can work is not where I live (Me). But this is also the reason why I have thought about deadlines very far in the time… in the end between attempts, restarts and more, I would really like to finish it by when my son is old enough to appreciate it. If, on the contrary, I had the opportunity to spend a few days a month ahead (or below) to the telescope, maybe it would be different, maybe I wish I had some’ bigger than my current D150 but I would like it now. Anyhow, I'll think about it and don't rule out that while I think about 500 can also make attempts with a 200 or so. Let's say that for now I'm almost tempted to switch to an f4 instead of an f3. Is’ It is true that I would see Vega standing on a stool, but after all ... who ever looks at Vega?? And the nanometer problem would more than halve, if I'm not wrong.For the initial excavation, I thought not so much about a horizontal pendulum (I also thought of a vertical pendulum, in height I would be there
) but to a machine that I would very gladly build myself. I am still undecided whether to put the eccentric or not, but I understand that it would suit me. Anyhow, more than a whole pendulum I thought of a “pendulum in half” rather, a 2.82°. This is why I was thinking of a machine with one arm (possibly with eccentric but for now let's consider it fixed) able to position the tool parallel to a 2.82 ° inclined plane with respect to the rotating table top. In this way, I could dig the flat face relatively quickly with a 300mm diameter rotary tool, such as diamond blade or diamond cup or something similar. I need to see what's available for purchase. By letting the arm go down vertically but maintaining the inclination of the top, the sphere arises as a result. It is then a question of perfecting or polishing it and real problems arise there, from what I understand and you tell me. All this if I don't get the meniscus (and apparently a 20mm meniscus can go) although I suppose it will need to be fixed anyway. Let's say for now I want to tackle one problem at a time and the first is the sphere.
So my next step will be to understand the testers (if I'm not mistaken Ronchi is the most suitable for a fast focal length) and design-build the machine.
As the glass or glass arrives, I'll keep you up-to-date, hoping you will assist me just to tell me “we all told you!!” but above all assuming you have the time to start the adventure!
Good night and thanks for the welcome, info and warnings.
A -
AuthorPosts
