- This topic has 170 replies, 5 voices, and was last updated 4 years, 9 months ago by
Giulio TiberinI .
-
AuthorPosts
-
28 August 2017 at 21:53 #10322
Ok, the plaster tool is ready but the anxiety is palpable…
I'm not so sure I'm using le anymore “squares "Candy"” pitch because they involve a whole series of steps that, having never had to deal with a substance like this, I don't feel like facing (mold creation, casting into molds, removal from molds, fusion and sticking of the back of each square etc.).
It seems to give me more confidence to face the classic tool-pitch-mirror sandwich and subsequent channel creation.
What do you think?28 August 2017 at 23:23 #10323…I think you have to follow your instincts. On the other hand, historically the path of the entire casting has always been chosen, which is apparently the simplest.
At the time I chose the candy route because (being very practical of silicone casting to make the mold) more congenial to my nature, tending to “lengthen the way a little” to bypass direct casting, that to me neophyte, appeared too concise and quick an operation from “to drive” to get a good lasting tool.
The pitch candies were for me inexperienced, a guarantee of clean work without haste, ….that is a kind of oxymoron like “simplifying complication”…which allowed me not to have to act quickly to fully master the process and get it clean, my best tool without fail.
31 August 2017 at 18:59 #10328As I suspected the pitch tool is driving me crazy…I did the casting without problems and I kept the mirror and the tool pressed to make the pitch take the right shape, after which I opened the channels with the soldering iron as suggested by many. Biggest mistake I couldn't make. Apart from the smell despite being on the terrace, but when I finished opening I had to press again long enough to have a homogeneous contact. Only in the meantime the channels have partially closed and then off to the welder again… At the moment I have dirty everywhere, I also have pitch behind my ears and a bit of despair that I will try to make go away with a good ice cold beer. Now I'm trying to make it take shape again.

Update: Nothing, I can't slide the tool even though it is now in contact everywhere. I do two or three times back and forth freezes and no longer flows, it doesn't matter if you put more or less abrasive, more or less water. I do not know what to do.
31 August 2017 at 21:00 #10330I managed to make everything work well, needed more weight for longer. So let's say we have it but the problem remains the too high temperature in my studio, alas the only room in the house without air conditioner. 31° C are many and my pitch is suitable for working temperatures ranging from 18 to 26 degrees approximately, consequently the canals have almost closed after an hour and now I think I should wait for the weekend and the expected drop in temperature. However, it is already a good sign that everything works and that the momentary loss was just a problem of “shape”

(Here still not completely in contact)
 1 September 2017 at 1:29 #10331
some comments “freewheeling”:
WEIGHT OF HANDS:
Be careful not to crush the tool on top. Polishing is better though , at least towards the end, takes place beautiful and regularized by the weight of the tool only. And therefore it is better to practice before getting into parabolic, to drag the tool only by its front or rear edge, not to imprint an uncontrollable variability of its action (..and therefore be able to predict the corrective action indicated, and its duration, having been freed from disturbing variables introduced by our behavior, especially considering the machining tolerances that will arrive at 68,75 millionths of a millimeter).ADAPTATION:
The adaptation of the pitch to the surface of the mirror is instead very important until the end of the processing. I had the inverse problem of the too little heat of the 18 ° C environment, with Gugolz pitch #55, and I had to heat the environment a 20 or 21 ° C because after 30 or 40 minutes of work, the pitch began to smell of conifer and to make Cerium oxide foam. In that case you would redo some pieces of the canal only after several hours of workTO SEE THE ADAPTATION AT A GLANCE: Where there is already good contact and where there is not yet, I have always found it very useful to interpose between pitch and mirror, a sheet of Domopak, kitchen polyethylene: When you pick up the tool and look at the polyethylene, good contact shows you black squares, non-contact shows them translucent only or partially black.
PECE HARDNESS: And, working at too high a temperature sags the pitch too quickly without making it work right…And redoing the channels is not a pleasant activity; (while on the contrary a hard pitch would be much worse, because it digs errors everywhere without following the curvature of the glass).
As long as you're alone in polishing, the thing can however be instructive even if inefficient, ma (removed the pick-up of “cotiledoni”) little harmful.
ADVICE:
However set that for the start of parabolization, and to do the Ronchi and Foucault tests, it is advisable to find a place to work at room temperature as constant as possible… That is, rather in the cellar or in the basement…or in other season. Why arriving in parabolization, where the tolerances gradually narrow down to 68.75 nanometers high., you would not be able to understand anything of what happens, nor the timing of applying the necessary corrections, and this despite the good adaptation, due only to the variability of the temperature on the pitch (caused by that of the environment).2 September 2017 at 10:43 #10339Thank you Giulio, great advice… luckily it came naturally to me to work already pushing and pulling only the edge of the mirror, touching as little surface as possible, This is to get used to not heating glass areas close to the face with my fingers.
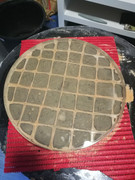
A little tip for those who want to open the channels using a soldering iron (or similar methods by casting).
I learned that by masking the pitch with paper tape, delimiting the channels to be opened, comes a very neat and precise job, the pitch does not get dirty or deform as it did the first time with consequent difficulty in making contact with the surface again.
In practice, vertical strips are taped, leaving the spaces of the desired channels uncovered, then the tool is placed almost vertically with a container underneath where the discharged pitch will be poured. It starts from the bottom and begins to dissolve the channels gradually rising towards the middle of the tool. It starts from the bottom so that the pitch that melts upstream already finds the drainage channel free and does not take unwanted roads. In order not to have to make the pitch go too far higher, I found it useful to reach halfway through the tool, then turn it 180 ° and complete the other half.
Remove the tape, place new strips at 90 ° and do the same operations to obtain the grid.
I have to change my mind about this method, I was the wrong approach. Simply marking the channels with the pressure of a V-shaped tool means moving the pitch from one place to another without removing it with the consequence that the shape of the tool is deformed more and above all that the tendency of the channels to close is greater. However, by removing the material from the channels these problems do not arise and also the adaptation phase is practically immediate.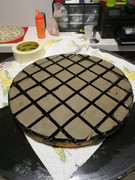 3 September 2017 at 8:41 #10340
Great instructional tips for everyone!
4 September 2017 at 16:28 #10341My warmest congratulations.

A really nice tool to look at and I'm sure functional for the purpose 5 September 2017 at 0:23 #10342
Thank you guys, for now I am satisfied with the progress. I begin to understand more and more things and this is above all thanks to you and to San Giulio who fills me with extra useful material.
Tonight after a few hours of polishing I was finally able to measure the real focal length of the mirror. By removing the lens from a laser pointer fixed on a support and directing it towards the mirror, I tried to accurately identify the return focus and consequently the radius of curvature which turned out to be 3608 mm.
So at the moment the focal length of 1804 mm appears to be in line with the initial goal of obtaining an F / 6 ratio.
Over the next few days I will focus on building a mirror holder and setup to perform the Ronchi and Foucault tests.
Rather, does anyone know where to find a semi-reflective mirror? I would like to build a rather precise test bench so that it can be used better even with multiple mirrors “fast” (mmm… and, I have the doubt that I will continue my career as a scratch glass ).
).
The Ronchi reticle I have yet to see how to create it because I do not have precise laser printers available and with the fishing line it is a bit cumbersome.
I found an American shop that truly has everything I need (the famous edmund optics) but it has hallucinating prices and in addition being in america times, costs, customs scare me a little. If you have other options I'm all ears 5 September 2017 at 9:59 #10343
Hi Stefano
I think the DIY solution that would give an almost professional result, although a little laborious ( and archaic), Today would be less easy but not impossible, to use as a pattern of Ronchi, the photographic negative of a photo taken with a film camera, to a sheet of cardboard white A3, filled for its 420mm width with 210 black vertical lines made with a 1mm tip marker interspersed with a white space as well off a millimeter.Zooming with the machine to fill the frame would produce a negative (for example in 24x36mm format that is, a time called “format 135”) with about 5,8 per millimeter…that gives 5 onwards they are sufficient for the need to.
Alternatively you can also take pictures with the same machine the image of the reticle accompanying the book Ferioli ("Notes of astronomical optics") I have sent you as a scanned image 1200 lines per inch, maybe projecting it on a screen or on the video of a TV, to see what comes out.
5 September 2017 at 16:10 #10346Hi Stefano. In support of any experiment in photography above, if it were in your ability and interest, I send you by e-mail following my pdf document, which it is A3 (420x297mm) designed with a grid with 1mm pitch.
In other words, the sheet contains 210 bienche and vertical black lines arranged along its width of 420mm, and its image could be projected or viewed on a TV or high definition monitor for the taking with an analogue machine, better (but not essential), whether with black and white film.
If the page were photographed in order to zoom in and fill the width of a frame format 135, ie by 36mm wide by 24 tall, the negative that would result would be directly usable as a pattern, why would the 210 lines focused on 36mm, or a step (210/36=) 5.8 per millimeter, and it could be mounted on a subframe from slide to use it as a very good and well-defined pattern of Ronchi.
https://www.grattavetro.it/wp-content/uploads/2017/09/RonchiGrating5linee-mm2-Model-1.pdf
5 September 2017 at 17:15 #10349Ciao
I think the simplest solution, faster and cheaper to have the reticle is still printing with a laser asking the favor of someone who owns it. Alternatively, you could print it with an inkjet capable of printing high resolution photos, inferior quality gratings are obtained but still usable for the purpose. I was able to print them both ways, then placing a rectangle of appropriate size on a slide holder, the results obtained are however satisfactory in both cases. It is clear that the less precise the print, the less clear the lines that appear on the Ronchi image will appear, causing the observer to doubt that the mirror has a rough surface, but said possible roughness is better evaluated with Foucault's blade. Having said that, I think you should at least give it a try and evaluate the result.
One last recommendation, transparencies for printing with lasers and those for inkjet printers are different and incompatible with each other. Those for inkjets have one of the two surfaces slightly rough in order to allow the absorption of the ink. These sheets used on lasers tend to melt and stick to the platen roller (big trouble).
Those for lasers have perfectly smooth surfaces and if they are used on inkjets they do not absorb the ink that would spread and ruin the print, so eventually at the stationery you will have to ask for the appropriate transparencies. To obtain the drawing of the lines you can use a special program (whose name escapes me now) downloadable from the net and that allows you to print the number of lines per millimeter you prefer. 6 September 2017 at 11:08 #10350It is not the best but I think is the best surrogate and the cheapest way to make a normal glass in the form of semi-reflecting mirror:
I did years ago to replace the windows of the huge picture window of my office with translucent glass was then called “Mirrophen”, and I kept it a piece that I cut and used for various experiments.
But that type of glass had a delicate coating on the outer face, so that the male of tits that were in assiene couples to other birds to eat the birdseed that I put them on the windowsill, attacking his reflection in shots spurs believing a avverario, resulting in scratching the delicate finish.
 http://www.trekportal.it/coelestis/archive/index.php/t-57792.html6 September 2017 at 17:56 #10353
I've seen that are for sale indifferently 7,5 dollars each, various Ronchi gratings on a transparent plastic sheet from 44x38mm, with densities ranging from 2 per millimeter in 7,8 per millimeter here: http://www.willbell.com/ATMSupplies/ATM_Supplies.htm (scroll to bottom of page)
Being that can be shipped with a simple envelope should have no shipping costs will of senseless customs.
6 September 2017 at 23:43 #10354Thanks for the tips guys, in the end I chose to try to buy a couple of grids from the site that Giulio gave me, one from 125 lp / inch or 4,92 lines per mm and one from 200 lp / inch that correspond to 7,87 lines per mm. For about twenty euros including shipping you can try

Somewhere around the house I should have a film SLR, but even if I found it again, it seems a bit too cumbersome nowadays… although it is a qualitatively efficient method, it is not for the entire roll purchase process, model photography, development etc.
In the meantime, I continue to polish and we hope it won't take years to arrive! -
AuthorPosts
- You must be logged in to reply to this topic.