- This topic has 170 replies, 5 voices, and was last updated 4 years, 8 months ago by
Giulio TiberinI .
-
AuthorPosts
-
8 August 2017 at 22:27 #10290
Well with chordal it is obvious that the board is not working… in both cases working with past 1 / 3D is a must, as it is a must to first get a good ball before passing to finer grits. I was wondering if you only use the chordal gradually reducing the overhang and then use less 1 / 3D is faster or “better ” that use the chordal with a fixed overhang until the arrow and then work a lot more than 1 / 3D to get what in the end is the usual result. I used the second method, I see that some people use the first one, but in both cases the end you get the ball. With the spherometer'm checking all the time and at the moment I can continue to work with the tool over until the center will be not affected by the work. In this way the edges are gradually shrinking. If the center will be affected before reaching the edges then I begin to alternate tool and mirror to keep the arrow

Regarding the problem of the two areas I'm noticing that going forward with past the problem is fading, then forward!9 August 2017 at 13:03 #10291Nice work Stefano, You seem entirely to the first mirror, surely you have a “feeling” natural with the art of scratching

Regarding the chordal considers, how could you see, which it is a very aggressive technique, that does not accord with the precision of the form. Thou hast made a little’ softer, because you've applied the pressure at the center, which is obtained by placing the palm of the hand at the center of the mirror and concentrating on it the weight of the body, but the result would have been identical, only one po’ faster…
In the words of the Gim 1/3 COC is preferable to regularize the form, also because reducing the offset of chordal you do is gradually get closer to the 1 / 3D, decreasing the action in the middle and increasing it on the rest of the surface. It might as well use it immediately so that it acts immediately on the areas in need.
9 August 2017 at 15:33 #10293Thanks Massimo, what is certain is that he is willing to me a lot… In fact most of the work has been done with one hand pressing on the center and the other to accompany it in this video had almost reached the arrow, and then I was cautious ahead without adding too much weight. I have read several articles and I realized why the variable is used dell'overhang system with chordal. Past 1 / 3D wear away very little and with chordal used as Have I used depression is somewhat limited to the glass central. In this case with past 1 / 3D must therefore take away a greater amount of material. Indicatively, you go to work almost all the outer half of the glass using only 1 / 3D. Instead, using a progressive overhang with chordal not go certainly to create the sphere but is made to facilitate the work of past 1 / 3D making find less material to be abraded seen their poor power removal. This is what I show some items, However, I remain doubtful about it because nothing is created and nothing is destroyed and is then I think that still reducing the overhang is also reduced “power” the chordal becoming more and more similar to 1 / 3D so I'm not even me all these benefits. Maybe the next one so I'll try
 10 August 2017 at 15:15 #10294
Stefano, I think the 1 / 3D does not have less ability to abrasion compared to the chordal, I think the difference is in the fact that in the chordal force is concentrated at the center mirror / tool edge, the place where you have between two surfaces the maximum stress, while the other is “spread” over the entire surface.
I have always been a “supporter” that the 1 / 3D adds no depth ( if not in very small quantities ) exactly for this reason , while the consumption of material is analogous to the other past.
Who wants to take away the curiosity, You can try to work several hours later with the past to 1/3 ( I did it ) making tens of dried with the grain 80 and one will notice that the center / edge depth has increased very little, 1/10 mm to be lucky ) while the consumption of material is huge, to the point that it is easy to meet the mirror with the same identical shape but starting with 1:00 to 2:00 millimeters less, of the edge mirror thickness! in practice, the spherical shape remains constant and the depth is added uniformly to the entire surface.
The 1/3 COC is the technique that allows to work the two surfaces in a uniform manner, all areas are reached by abrasion in the same way, if then, We consider the fact that the sphere is the only geometric shape that allows two surfaces to remain always in contact, however, the move over one another, one understands why the 1 / 3COC generates a sphere “naturally”, precisely because of this uniformity of processing properties.
The small depth that still adds to the arrow even with the 1/3 COC is due to the interposition of the abrasive between the two surfaces, which generates a small thickness, which tends to keep a different radius of curvature between the mirror and the tool.If there is interest I summarized the conversation in this article.
In any case, my advice is always to take a lot of confidence with the most classic techniques, before trying alternative solutions, to study it and use it until you know how “own pockets” , as it is “lo standard”, both in roughing it in polishing, the reference to which all other techniques ( Also in parabolizzazione ) It is to be compared to be able to establish capacity, possibility, efficiency and performance. You would not be able to properly evaluate any aspect ameliorative or a specification of a technical functionality if it is not included in the fund 1/3 COC.
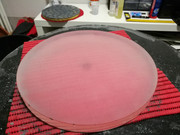
12 August 2017 at 0:07 #10295Here I am a little update:
I continued with the grain 80 until you get to the edge but without insisting too much… I preferred to use a finer grained (180) to work in peace without risking small chips. I have read in some constructive report with grains as big as 60 e 80 there is a risk that by forcing in the edge area, despite this has been beveled, They can create small chips.
After all, I thoroughly cleaned, however realized that the dental plaster tool presented some tiny holes, due to micro air bubbles in the casting, that they could retain abrasive grits. On the back I then overcoated with a two-component glue layer Prochima 5 while on the front I used a plasticizer Saratoga paint (Plasti Spray).
Once dried, I started working with the grain 180 with the tool above.
After some annoyed I carried out a sharpie drawing tests the grid with a permanent marker and making a couple of full laps past 1 / 3D I noticed that the outside area (circa 1/6 from the edge) It vanished before with respect to the most central area, clear sign that it was still necessary to work a bit with the tool above (always keeping an eye on the arrow).
After another bit of work with the tool above I I started to alternate TOT and MOT to maintain the correct focal.
By the sharpie test again it would seem to result in line with expectations:
Tomorrow then continue to alternate TOT and MOT with the grain 180 until they will no longer be visible small craters of the previous grit, We are in any case already be seen relatively few work today.14 August 2017 at 23:23 #10297We came to the grain 320, I've done work an hour and the surface seems very homogeneous and free of craters:

Wednesday should get me the microscope usb to control the surface with the advance of finer grits… Now I have a couple of little questions for you.
What is the best way to assess the scope of this processing stage? That, you have to take the pencil / pen test for good or there are other methods more precise? The focal distance is measured by wetting the mirror is fine, the arrow corresponds to the calculations (although in reality, for completeness, I wanted to see the value because with the bevel angles of the mirror measured 298,5mm and the arrow was then dropped by a couple of tenths to stay in the correct focal), the marker test continues to be homogeneous, however I can not be sure of the correct sphericity. We should wait for a good polishing and consequently the true optical test and own or is there a feasible way these stages? My fear is getting ahead with some unrecoverable error if not going back with grits
Theoretically it should be alright… I think… I hope…
Another question, I read an article where it was suggested to add a soap goccino in finer grits to be used in emulsion, ie a part of abrasive, 3 parts of water and a few drop of soap and lather all. Reported the advantage of dried longer and more manageable. Have you ever tried? In your experience could be an effective board?15 August 2017 at 21:25 #10298Great Stefano !
I like how it works, do not neglect any detail and from your thoughts you feel the attention and passion that you put in what you do.. “adjustment” of the arrow as a function of the chamfer at the edge is something touching for me  I thought I was the only one to feel it essential !
Regarding the sphere is difficult to give any opinion as I do not have to hand the tool you are using, if it had been glass or less “ducted” I would have said the test of “bubbles” but in this case I do not know…
The use of lubricants is well known, although personally I've never used it. In this regard I know that Giulio ( if I remember correctly ) has more than once suggested to use dishwashing detergents or similar…
In any case continues, this is the right approach that will soon give you all the answers you need, and you in good stead in the most demanding polishing steps and parabolizzazione… I'm sure if you will keep this methodology, do an excellent mirror !
16 August 2017 at 13:53 #10299Thanks Massimo, glad to know not to be the only psycho around
No Seriously, I think they are the details that make the difference between a successful business and one that “You could have been done better” (then you can always do better anyway), so I like to pay attention to the little things.
Today I got the usb microscope, It paid € 29 turns out to be very formidable.
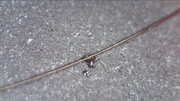
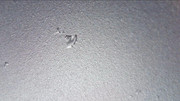
I then searched for the presence of craters on the surface and the only noteworthy is this, compared to the size of my hair:
I will work a little longer with 320 and then I pass to 25my 21 August 2017 at 21:51 #10305So guys, After a few days off I went back under. They are the grit 15 microns and the surface starts to become more and more velvety and pleasant
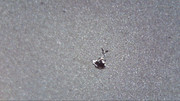
The arrow continues to be stable and I continue to alternate Mot and Tot, I measured the focal with a laser wetting the mirror and measures 1805 mm so we. What I did for a while to think about right now are the 3 or 4 craters that I found with the microscope (that look very big but very magnified because almost invisible to the naked eye). I am alone 3 or 4, of which I am attaching photos of the largest, and the question is: you think, They will fall into place on their own even though he is already using quite fine grits? And in the case they would not be in place that you? They leave them or you go back to work? The impact on the final product? In your mirrors you have left? For precision two are almost in the center and then view the obstruction of the secondary should not give any discomfort, the other two in one half and one to a few cm from the edge. Anyway I hope to fall into place…Sorry for the questions in bursts but fussy as I'm paranoid
 21 August 2017 at 23:31 #10308
This is how it has reduced the scale with twenty minutes of work… it seems recoverable.
 21 August 2017 at 23:50 #10309
Hi Stefano. Complimentj for work and good critical sense.
The use of detergent drops it was necessary for me in oxide polishing with the use of zirconium instead of the cerium.
The latter was better because after the first half hour of work, when the pitch due to friction heats up and emits the smell of conifer carattetistico, unlike the zirconium, prmetteva simultaneously the formation of the froth of the abrasive which favors its circulation and ricambo on pitch quadretti, improving polishing and bringing the tool even to whistle, from his great work. (but I did not insist the whistle, lubricating, why, Unlike like Texereau said, for me a whistle is synonymous with potentially be imparted in the mechanical vibration of the mirror glass).As for the craters, prchè do not worry it is normal that someone remains unrecoverable with fine grains much smaller than their size.
The raporto between the size of the current grain and quele the crater to see under the microscope, and you could just delete them easily with grains having a size of crater half, the the 1/4 exponentially more work…..
Please note that all the mirrors because they often form a betrayal of invisible chipping-shaped peninsula glass blowing, that is held together by a single tooth tip, and they are therefore necessarily of a size not more conveniently recoverable.22 August 2017 at 21:47 #10312Since an error was born the solution to the problem. Practically I was wrong sequence of abrasives skipping 25 microns. I realized just tonight of being passed from grain 320 to the 15 (of drawers error reversed) and so, even though I had cumunque now well-worked surface, I decided to return to 25 and the craters are floor plan disappeared!
Come on!23 August 2017 at 14:53 #10313…Indeed, from very fine texture of the visible crater in the background image (as far as I can see without magnification, by phone), compared to the crater SIZED appearing perhaps, not just two or three, but ten times more, you were right to return to 28 microns…(which already are few “and tiring” compared to the size of the crater indicted).
Otherwise you'd have to leave… however, reflecting a good job.I can only suggest to mark the back of the mirror indelible pennarelo concurrently each “alien”
..to keep an eye before hone lot and get into polishing, for having to abandon the recovery.24 August 2017 at 19:55 #10315Today I worked the mirror for an hour with grit 5 microns. At the moment I do not detect any crater and the surface is satisfactory in each zone. I started checking with the microscope the center and gradually from outlying areas not experiencing changes. I have seen with pleasure that the finer grits require much less work and above all much less fatigue. from 15 microns onwards (15-9-5-3) I opted for an emulsion consisting of 1 part of abrasive 4 parts water and two or three drops of good durability of dried experiencing mild soap that I never left “Pull” too much… He changed slightly as the sound of the past I added a sprinkling of mixture.
I alternated mot and tot maintaining a pass 1 / 3D which has proved ideal to keep the ball and control with precision and lightness mirror and the tool.
Tomorrow I will use the grain from 3 micron despite many do not use these fine grits so passing immediately to step polishing simply keeping it for a longer duration. I preferred to take well-advanced in abrasive to manage in a less challenging the already perceived as tough polishing stage.
Here is the image of a hair compared to finish by 5 microns: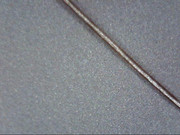
For polishing I will opt for a completely new tool, always in dental plaster, that most likely I will create with the technique of “squares "Candy"” pitch.
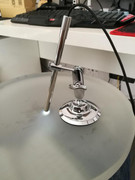
Another thing to do in a week will be a grid of rhonchi with fishing wire 0,125mm and the setup of a test foucault.
Good evening everybody!26 August 2017 at 9:52 #10316Beautiful and clear picture in relation to the hair!
From the summary scaling done on it, its diameter assuming a ~ 5 hundredths of a mm, craters proportionally seem just around the 6 microns.I see that the USB microscope is much better than the manual one nevertheless had the comfy lattice with division 2 cents mm.
-
AuthorPosts
- You must be logged in to reply to this topic.